Sew Over This

Tuesday, July 30, 2013

Sorry for the lack of photos but I was so frustrated grabbing my camera was the furthest thing from my mind.

When Jon and I were cleaning out our garage I found a box of his old football t shirts. I wanted to throw them out (when will he ever wear it again?) and he wanted to keep them (they're memories!). To compromise I asked Jonathan if he would let me turn them into a t shirt quilt. He was a little hesitant to allow me near his precious proof of football glory with scissors but after showing him a few photos he gave me the go ahead.

I found this really amazing tutorial and it looked manageable so I got started. It didn't look that hard.... Famous last words. Right?

To preface this, I don't know how to sew. I'm handy with a needle and thread so if I need to stitch a quick hem or mend a hole by hand I'm good. But I don't know how to use a sewing machine. I've never owned one but have always been interested to learn. I figure that's the next step in my crafting journey.

First I had to decide with shirts I was going to use. Jonathan really wanted me to use as much and as many of the shirts as possible. I cut them up so the front and back were separated and then snipped off the sleeves. Then it was time to adhere the interfacing to the shirts. Whenever you want to sew shirts (and probably other fabric that pulls) you have to attach some interfacing so that the fabric stays sturdy and it doesn't pull while you're running it through the sewing machine. All you have to do is iron it to the back of the shirt. The only tricky part here is not to use the iron directly on any screen printed shirts since it can make a melty mess. I gotta say at this point I was feeling pretty confident. Should have been another sign....

The next step was to cut the shirts into perfect square. Apparently that part is really important so you have straight edges to sew along. Quilters have an easy solution to help you achieve this: quilting squares. You just buy one that is the size you want, center it on top of the fabric and use a rotary cutter (sort of like tracing it) to cut a square. They even take into account the extra bit you'll need to sew a seam. I needed an extra pair of hands to hold the square in place (thanks Maddy!) but it went pretty smoothly.


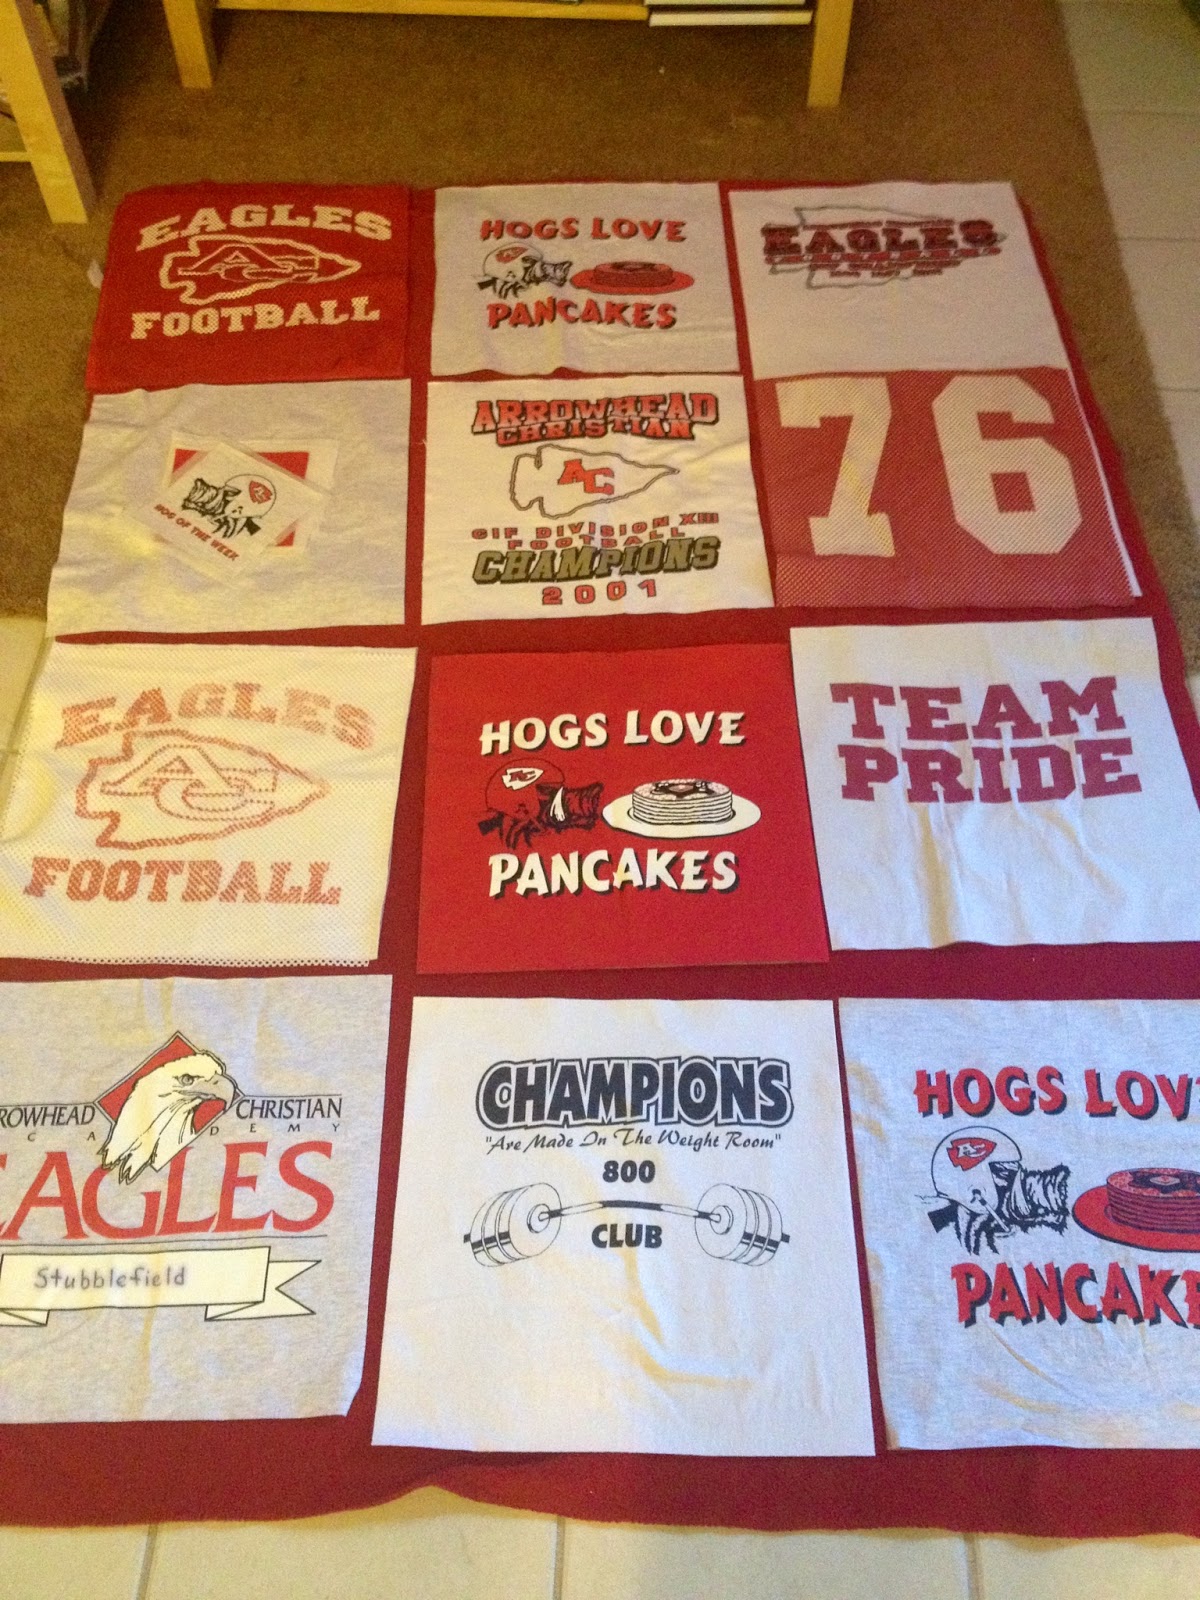
I laid out the squares on the floor until I had an arrangement that I liked. I even snapped a couple of photos on my phone to remember the layout. Then I got to sewing and trouble began. Since I don't own a sewing machine my sister let me borrow the one she received for Christmas. Neither one of us really knew what we were doing and on our first attempt to use it we actually forgot the pedal and power strip. Fail.

Once I finally had all the parts I tried to get the sewing machine ready for use. First up is threading the bobbin. the bobbin took me awhile (okay an hour) to figure out. Jon came over to help me and between the two of us reading the instructions and trial and error we managed to figure it out. Next was threading the needle. That was actually pretty easy. I thought the worst part was over. WRONG. I had everything ready to go but could not get the machine to move the fabric. It would make one stitch and then get jammed. Over and over and over again. So. Frustrating. I can't even tell you how many times I had to stop my pitiful attempt at sewing, turn off the machine and unjam the bobbin and needle. All I kept getting was a clump of thread that I had to cut out. I finally quit when I broke the needle. It was three in the morning and I figured five hours of sewing torture was enough.

I should have known it wouldn't be easy.

Jon told his mom and she said the next time she's over she'll help me set it up. For now the squares are sitting in the guest room closet far far away from my eyes. But sadly its not out of sight, out of mind. I keep thinking that I should just start sewing by hand but I stop myself because I know I'll sew it in a crazy jagged line and probably go blind.

For now I'm declaring this project a temporary failure. At least I didn't butcher it beyond repair... its just on hold. Unless someone wants to sew it for me. That'd be super.

Ready For Guests

Friday, July 26, 2013

Jon and I are hosting one my roommates from college and her fiancé this weekend. Obviously I was excited at the prospect of having them stay with us and immediately said yes to the proposed stay. After I told Jon about it I thought "dude, I gotta clean out that room!" Because it looked like this....


I let that get way too out of control.


It all started when I found this awesome cabinet on Craigslist (thanks for your help dad!) I thought it would be perfect in that closet to hold all our books. We had an old bookshelf of Jon's in there but I felt like it took up too much space.The Craigslist one fit perfectly on one side of the closet so the other side could remain open for guests to utilize. One Friday morning (I don't work Fridays in summer) I moved and organized all the books in the new cabinet. I don't have a before photo but trust me its a big improvement.


The only problem was that I took everything out of the closet to do it. Hence the explosion of the stuff. I can't even blame Jon. I'm the one who removed all the contents and honestly the messier stuff was my craft stuff. In case you can't tell, I have a lot. I told Jon I'm not allowed to buy more stuff for awhile. Sorry Michael's!


I ended up organizing all my craft stuff into the rolling plastic compartment thing. I figure its low enough where guests can hang clothing without it getting in the way. Plus it has wheels so I can wheel it out when I'm working on project. But this is only a temporary solution. That thing is too old (I've had it since college!) and I'd like something that's sturdier since my craft stuff is heavy.

On the shelf is the gift wrapping stuff and some boxes of our personal mementos. Jon and I both have saved ticket stubs from our travels, cards from our families and random stuff thats too special to throw away but we don't really have a place to display it.

Once all the organizing was done (it took two days) I could finally clean and do all the things you do to get your house ready for guests. This part wouldn't have been so bad if I hadn't accidentally spilled glitter while organizing my craft stuff. Glitter is so hard to clean up. Even Poseidon had some glitter on him!


By the time you'll be reading this I'll be enjoying the weekend and the company of good friends. Probably with some type of adult beverage in hand.

Free Is My Favorite

Wednesday, July 24, 2013

Remember how we started to work on our backyard but never finished? Well thanks to my parents we made progress!


My parents had this patio furniture for years. I think they bought it when we first moved into their current home. It came unfinished and my parents painted it a bright peach (my mom's favorite color). A few years later my mom was over the peach and decided on a dark brown that's similar to the style of furniture she has in her home. A few years after that my dad wanted to get rid of it because it wasn't getting a lot of use. So they very kindly sent it our way.


Its currently set up on one side of our backyard like its own lounge area. The outdoor dining table and grill are on the other side. We moved our plants around so the green is spread out a bit. Down the line I'd like to get more faux grass and plants, an outdoor rug and a little table to rest in between the two chairs.


As for the grass that's actually remnants of artificial grass. One of my mom's neighbors installed in at their home and allowed my mom to take the pieces. Jon and I were thinking about getting fake grass. Since the backyard is all concrete there's not really an easy way to lay sod. Plus we'd have to install a sprinkler system. And shove a lawnmower throughout the garage door anytime we Jon needed to mow the lawn. Waaaay too much work. 

So when my mom saw that she could get some for free she jumped all over it. She sent me a photo of her pile and said that now Poseidon could have somewhere to lay down in the backyard. "He loves grass! He needs some in the backyard." Direct quote. Poseidon is so spoiled. 

All I did was lay out the different pieces of grass around the furniture. The big pieces are long and skinny so an "L" layout seemed to be the way to go. It was sort of like making my own grassy puzzle. 


The three of us have definitely gotten more use out of the space since the update. Jon and I sit out there with coffee on Saturday mornings and wine in the evening after work. Ok, once with coffee. Thrice with drinks. But Poseidon spends a lot of time out there. He loves to lay in the grass and chew on his cow toe (yes, a real cow toe). I think he's saying "you caught me and my cow toe!"


We still have a bit more work to do but now that we have more than two chairs we can have guests back there! Weekend barbecue anyone? 


Poseidon's Post: Drive By Biking

Monday, July 22, 2013

Since Poseidon is now a member of this household we thought we'd let him make guest post appearance every now and then. 

Hi guys! I'm a little nervous to write my first blog post but since my new humans do it all the time I think I'll be ok.


The other night one of my new humans, Jonathan, took me for my walk. We had stopped because there was this light post that smelled really interesting. Then, out of nowhere, I heard this weird noise! I really thought it was some huge monster that was out to kill me and my new human. Not on my watch! I immediately stepped out to attack. 

BIG MISTAKE. 

Next thing I know I'm hit in face. Then my belly. A bicycle ran me over. It's as painful as it sounds especially when you're a little dog. 

My leash, the bike and its rider got all tangled up and Jon lost hold of my leash. I was really scared, a little hurt  and didn't know what to do so I yelped and took off running. I just wanted to get out of there. I ran and ran until I found a good little hiding spot. I needed to regroup. Getting hit by anything with wheels is traumatizing when you are a chipin

After awhile I decided to go back home. I was still scared and just wanted to see my humans. But they weren't there! So I sat and waited. I heard my name being called and all of sudden I see my other human, Berennisse, running back to our house. She scooped me up into her arms and yelled for Jonathan. Apparently they had been out looking for me. I guess they didn't know that I knew my way home. 

They were both really worried so they took me to the vet. The vet checked me out and said I was okay and let me go back to Jonathan and Berennisse. Jonathan looked really happy to see me but Berennisse cried. She cried and cried. But I think she was happy because she kept giving me lots of hugs and kisses.

I wanted to sleep with the humans that night but Jonathan said no. Berennisse and I were both sad. She said I needed puppy cuddles.

Anyway, at first I didn't want to walk past any bikes but now I'm back to barking at them. My humans don't seem to realize how dangerous they are! I keep having to remind them. I'm only barking to try to help!

Poor Poseidon and his drive by biking. 

When Poseidon took off running, Jon chased after him. The cyclist was really freaked out and tried to apologize but Jon was worried about Poseidon. As he was running he turned back to the cyclist and yelled, "not your fault!" After he did some searching on his own he came back to the house and got me. We were circling the neighborhood, calling his name. We were pretty freaked out when we couldn't find him. We didn't know if was hurt or lost. I decided to come back home to get some decent clothes on and there he was just sitting on the porch shaking. Poor puppy. 

Jon & I did a quick check for any cuts but couldn't find any. Since he got hit in the head we decided to take him to the vet just to make sure he was fine. I was totally fine on the drive there and checking him in. But when the vet came out it was game over. The vet said "he's fine" and I just lost it. I cried the entire time we were there. Jon told me Poseidon was fine but all previous unshed tears came out in full force. When Poseidon came out he was still so scared. He just wanted to be held. 

We hoped that he would learn his lesson and be nice to bikes but now he's scared. He barks at all of them like they're going to attack. You can't blame him, one did attack him. 

Wall All Full

Thursday, July 18, 2013

Look Mom! No more stripes!


I guess my post about our half finished living room got us motivated. Maybe its because that I'm having friends over this weekend. Or the fact we have some house guests coming at the end of the month. I don't know. But something finally got to us and we finished!


Jon even cleaned when he was painting under the stairs. 


I love love love love love this color. Its warm, inviting and the perfect neutral. Its a great starting point for this room. Our house looks so much more done now that the living room is painted. If we ignore the mismatched sofas and coffee tables. 

Obviously we still have a lot to do in here. We need a new couch. I think a smallish sectional would look good. Once we have a couch then we can get a coffee table. I'm not really fan of the two mismatched ones pushed together. And a new rug because that carpet remnant isn't really doing it for me. But these are all big ticket items that have to wait until we save enough money and find the ones we want. 

There are things that we can do now. We want to find away to hide all of the TV cables. I wish we could put them inside the wall but since its mounted above the fireplace that's not really an option. And we were discussing a photo gallery wall above the couch. I just have to be on the look out for frames. 

We love this color so much we are planning to use it in the stairway and upstairs hallway. That will give it some continuity since its an open space. Painting that area will be a bit more complicated because the ceilings are so high and we are still trying to figure out how to place a ladder on the landing. 

Progress. It feels good my friends!

Where Are My Keys?

Tuesday, July 16, 2013

I love that our house has a designated entryway. You need a place to toss your keys when you walk in the door. However, nobody walks in front door anymore. Jon & I don't. Only your guests do and while that's nice for them, its not practical for the people that live there. That's why mudrooms were invented but (like most people) our home did not come with one.

So what ends up happening? When Jon and I come home we toss our stuff on the nearest surface. Jon's stuff ends up on the corner of the couch. My keys end up on the mantle. And my purse lands on the coffee table.

Not the best system. It makes for crazy mornings where you can't find anything and it always looks messy. Sigh.

Since we enter the house throughout the garage and our sliding glass door I wanted to get some kind of console table to go on the other side of the fireplace. That way we'd have a place to put our stuff. I was searching all over for one that was the right dimensions and price. Until I spotted on on a Wayfair Daily Sale for $70.

The only problem was that I was at a work event without my wallet. I really wanted that table and didn't want it to sell out. I immediately texted Jon the link and asked him to buy it. Being the amazing husband he is, he did.

Check it out.


The baskets on the bottom hold my purse and Jon's briefcase. They $6 each from Ross. And they fit perfectly.


On the second shelf are some books and a few of our old yearbooks. Feel free to flip through them and laugh if you come over. On top is a wedding gift from a friend. It's a jar where we are supposed to write down moments from our first year of marriage. Such a thoughtful gift. Next to it is a book I made for Jon of our dating years.


On the other side is a white Chinese dragon statue. Jon bought me a mini blue one in China a few years ago. Its an old Chinese legend that there are two dragons that guard a city and always together. If you buy a pair and give your loved one and keep the other you will always be together as long each person keeps it. Then he told me he wanted to marry me one day. I cried. This statue reminded me of the mini ones we have.


On top of the table is a lamp which was a clearance find from Home Goods for $35.


The other photo book is of all of our engagements photos. In middle is a bowl where we toss our keys.


The candlesticks are from Target (on sale naturally). I have another of each one because I hope to use (all four) them on the dining table at fancy meals. They are open so you can put decorative stuff inside. So far all I've thought of is fake leaves or popcorn kernels for fall. The little box in front is from Kirklands for $2! I should have bought the one that said "coins" on it but right now it has our extra car keys and pool key in it.


The bowl is for us to toss our stuff into.

Since I already owned some of the stuff I didn't spend too much on it. I think the accessories were about $75 total. Which means the whole thing was under $150. I didn't buy it all at once so it doesn't really feel like I spent that much. But I love having a place for all of our stuff.

We need something to hang above it. I was thinking this subway art but I would have to buy a frame and I'm not really looking for one right now. I also think a photo would like but not of us. Too big. Maybe a canvas art piece? Obviously I'm still thinking about.

Anyway, I love our new little baskets. I've been placing my purse in there. Jon still has his briefcase and backpack on the couch. Husbands.


Wall Half Empty

Friday, July 12, 2013

After almost seven months of continuous home improvement projects things are slowing down at the Stubblefield house. Jonathan needs a break and the sunny days make it hard for us to spend weekends cooped up with a paintbrush. We haven't really tackled any new projects. In fact we only have one ongoing project... finish painting our living room.

Jon started doing a wall at a time.

We started in the entryway (with a quick decorating detour). The plan was to paint the rest of the room a wall at a time. Jon finished the wall that extends to the entryway and opens up in to the dining room first. He removed the air conditioning control, carbon monoxide alarm and doorbell. Can you say gross?


Much better.


As a side note check out what the extreme heat did. This was stuck around the inside of our paint can. Ewwwwwww.


Next up was the wall with our TV. Jon had to take down it and carefully paint around the mantle. We did not want to be touching that up.


After that he started on the last wall! Only to run out of paint.


Yeah, that's been like that for a while now. "Buy more paint" is on my to do list for today. Right underneath "buy a new pair of black flip flops." A certain cute furry nephew of mine decided it made a good snack.


Cleanliness is Next to Godliness

Wednesday, July 10, 2013

As some of you may have seen on Facebook and Instagram Jonathan and I having been watching our nephew, Poseidon.


Isn't he cute? Here's another because he's adorable.


The first weekend he stayed with us it was obvious someone needed a bath (ahem Poseidon, "God of the Sea"). Jon took one whiff and said "you need a bath little buddy." I reminded him that one of our previous guests (Heidi, that's you!) had complained that the water was cold in the guest bath. Jonathan tested the water out and sure enough, it was still coming out ice cold.

So, on a weekend where he said he wasn't going to do anything house related, Jon had to fix the water temperature for our furry little nephew. I only got a couple of photos because it was really boring to watch, I was in the way and I wanted to play with Poseidon.

Who could resist this face over bathroom knob repair stuff? Not I.


Jonathan removed the knob and water spout. He looked inside the wall. And did more stuff that looked impressive from where I was sitting.


In the end he found that the hot and cold knobs were switched. Thanks again previous homeowner! Please note that was meant to be read in your head in a sarcastic tone.

Finally, the three of us gathered in the guest bath to get Operation Clean Dog underway. Obviously Poseidon did not like his bath. Not impressive for the supposed ruler of the ocean. Jon ended up doing the cleaning and I bribed him to sit with lots of treats. The treats only worked for a tiny bit. He would take the treat, sit and after 3 seconds try to climb out. Once we were done I dried him off and then we took him outside to finishing drying in the sun. Then he napped because baths are exhausting when you're a dog.


Jon's happy Poseidon is smelling better, I'm happy our future guests can have warm baths and Poseidon's happy we gave him lots of treats.


And yes I know I've included more photos of Poseidon than the actual project. He's way cuter that bath tub knobs.

Welcome

Monday, July 8, 2013

Consider our entryway done!


Jonathan had already painted so all we needed was some kind of art on the wall.

Remember how we originally wanted to frame out the old mirror in the half bath but totally failed? Well, I didn't want to throw it out. I hoarded kept it in a closet because I wanted to reuse it. It's been in there for about six months just hanging out. Waiting. And then inspiration struck!

I had the mirror and some leftover trim from our framed monogram project so I decided to make a welcome mirror. I've seen a lot of vinyl sticker crafty things all over Pinterest and decided that would be perfect for my project. Most of the people who do those vinyl cutouts have a cricut or special die cut machine. I don't. So I shopped around on Etsy until I found one that I liked.

Another visit to my BFF, Home Depot and I picked a can of frosted spray paint. Then I gathered up my supplies and got to crafting.


First I centered and applied the sticker. I eyeballed it and as a result its a bit crooked but that just gives it character. Right? Getting the sticker onto the mirror was a little tricky. You only get one shot so I tried to go super slowly... BUT I messed it up a bit. I accidently stretched out one of the letters but managed to drag it back into place.

Then I taped off the middle part that was going to be frosted. I initially eyeballed that too. Thankfully my sister was here to tell me that it was really off and I was about the make a huge crafting boo boo. So I redid it the right way.


After that it was time to spray paint. I totally overdid it with the spray paint. I should have done thin even coats and waited for them dry. I didn't. Blame it on the heat and my impatience. As a result there are some drips. I thought that I had completely ruined the whole thing. I told Jon that I was going to have to scrape the paint off and start over. Jon said it was fine but I was feeling pretty bummed (and dramatic) about the whole thing.

When I looked at it in the sunlight the next day I felt a million times better about it. Jon said "Babe, I told you it was fine!" and I left it on the dining table for a few days....

Then I peeled off the sticker using tweezers. I had tried to use my nails and accidentally scratched off some of the paint. It's not that noticeable but I would like it better if its wasn't there. I don't really know how to fix that. I don't want to spray paint more because I think it would ruin the whole thing. So it will remain as is.

Then I built and assembled a frame for the mirror in the same way we did the monogram one but this time I did all by myself! Naturally since Jon wasn't there to help/oversee I cut the wood a little short because I measured off the broken corners of the mirror. Oops.


Next it was Jonathan's turn. I asked him to hang to the mirror but we had no way to do it. It had previously been up in the bathroom with cheap clip things. Obviously that wasn't going to work since the mirror was so much thicker now. I found these hook things at (where else?) Home Depot and got Jon's seal of I-think-this-will-work approval. He measured and marked when the holes should go.


The way they are supposed to work is by hammering in a plastic pin that acts as a nail to hang the hook. It looked really easy to do on the instructions but, of course, it wasn't. Jon had trouble with the first one and punched a hole with the second one.


Once Jon got all the yelling out of his system and patched the wall, he finished the two on the bottom.


Then we added two on the sides instead of on top. We did it that way so we could slide it in and out. It took us a little bit of effort to jam it in there but its there and we've checked off another item on our to do list.