- Started this blog!
- Painted & decorated the Man Cave (you can see our progress here & here)
- Finally finished our wedding guest book
- We celebrated 6 ridiculously happy months of marriage (check out our wedding pictures and video)
- Filed our taxes as a married couple (we're so grown up)
- Jonathan fixed our leaky kitchen sink
- Shared our (see mine here and Jon's here) failures in the half bath
- Named the true Star of the Blog
- Shared our humongous to do list
- Finally cleaned out the garage
- Created a new blog header thanks to this tutorial.
- Added pretty social media buttons- Thanks Carrie!

The Month in Review: April 2013
Tuesday, April 30, 2013
What Jonathan & I did in April:
The Star of the Blog...
Thursday, April 25, 2013
As we were getting the blog started Jonathan mentioned that he is the "Star of the Blog." I laughed and said "No! The house is!" But once I got to thinking about it I realized he's right.
This blog is about all the things we do to our home but nothing would be possible without him. He is the fixer of leaky sinks, official painter, designated spider killer, heavy item lifter, idea feasibility checker and Home Depot shopping companion. He's pretty awesome and my favorite person EVER. Not only does he listen when I say "You know what we should do..." but he helps me make all my pinspiration dreams for the house come true.

I love the man and am so happy (deliriously) to be married to my best friend, love of my life, and handiest husband. So, in honor of my other half and our 6 month (!) wedding anniversary Saturday, I've added "The Newlyweds" page where you can look at some photos of us throughout the years including our wedding video and photos. One stop stalking! Kidding... but you know you're going to look.
Since this is very lovey dovey post and not really related to our on going home improvements, I'm sharing our in-a-perfect-world-where-time-and-money-are-no-object To Do List on a new "The House" tab. (Does that get us back on track? Probably not.) We'll be updating the photos as we go!
To celebrate 6 months of wedded bliss we're opening a nice bottle of wine we got on our honeymoon in Napa. We're fancy like that.
I've Got The Power!
Tuesday, April 23, 2013
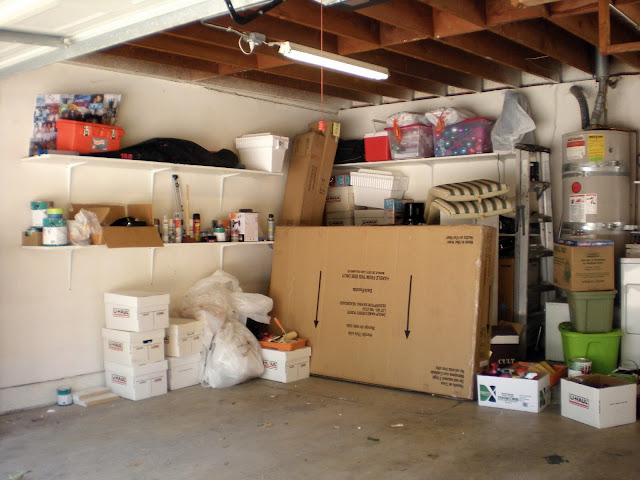
Saturday Jonathan and I decided to rearrange some shelves and finally organize our garage. Homeownership can be so glamorous.

Our garage is big enough to accomodate two cars but its smaller than the average two car garage. The previous owner lived alone and only had one car so the size wasn't an issue for her. She installed shelves around the garage at a height easily accesible for her. Sounds like a good idea right? WRONG. The shelves were so low that our car doors would always hit them as we were opening the doors. Trying to squeeze in between the car door and trash cans or a shelf with random stuff on it is not cool. Especially when you're wearing a cute outfit and don't want to get dirty.
I had always wanted to reposition the height of the shelves but its one of those projects that sat on the back burner. Especially in the Wedding- Birthday- Holidays craze that made up our first few months in the house. And then it was too cold to be out there. I don't do cold.

When autumn rolled around last year I put away all of our fans. I washed and covered them with trash bags and placed them in the garage on the shelves, leaving us plenty of space to get into and around our cars. Then the holidays came. All of our new Christmas stuff got thrown in the garage in a haphazard way but it was still maneuverable. Then we bought a new bed frame we didn't have a mattress for yet. Super tight squeeze but still manageable.
Eventually our garage was full of stuff everywhere. On our washer and dryer. On the floor between the cars. You name it, we had stuff on it.
Now that the temperatures have been rising I knew that it would soon be time for us to bust out our fans. Only I couldn't get to them. Even after three trips to the Salvation Army (you're welcome by the way). The time to move the shelves and organize the garage was upon us.
So Saturday rolls around and we get started. First Jon swept the entire garage and we took everything off the shelves.
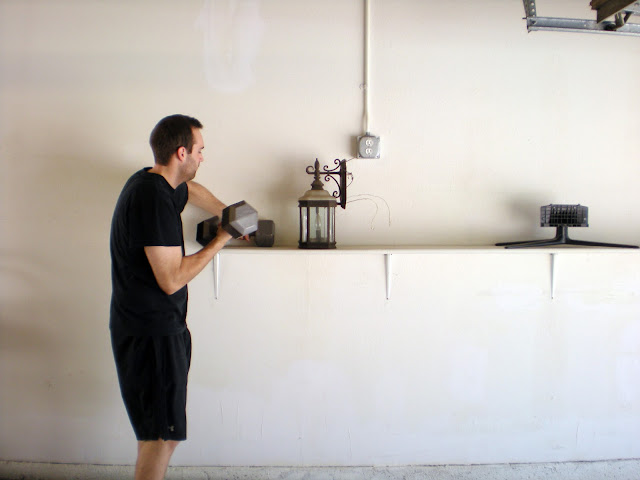
Then Jon removed the shelves. One side of the garage only had one shelf and we wanted to move it to other side. We left this wall blank (we might add another shelf one day but it would depend on our new car, which we'll buy one day, and its dimensions). We left the brackets attached to the shelves. We figured it had already been adjusted to match the width of the studs. How wrong we were....

We used me as a tool of measurement. We compared me against the cars and used that to set the new height for our shelf. Told you that's how we roll!

Then the real fun began. Jon was trying to hold up the first shelf while drilling it into the wall. That didn't work so well. So I decided to help by trying to hold it up while Jon drilled. And it still didn't work! The shelf kept shifting and we couldn't get it level.

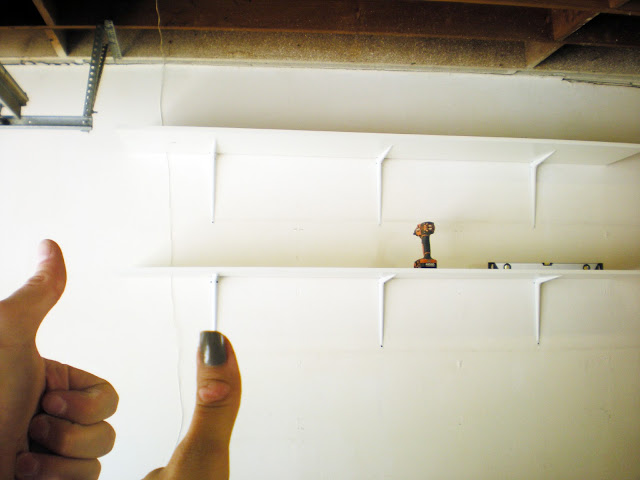
After two failed attempts I said "I'll drill. You hold it up." Jon looked at me in disbelief and said "Are you sure? Do you even know how to use a drill?" "No, but I can do it." And I DID IT. Such a big moment for me.
Yes, you read that right. I used a power drill. I did it (mostly) right and I liked it! You know I don't do manual labor. I must be growing up.

Check me out drilling! That's right- I included proof!
We figured the next two shelves would be easier to install since we now knew what we were doing. We couldn't have been more wrong. Jon's stud finder was totally failing us. I don't know why it was throwing a temper tantrum. It kept giving off inconsistent readings and so not all of our screws were hitting studs. It was super important that we hit studs since garage shelves need to be heavy duty.

It took several tries but we FINALLY got there.

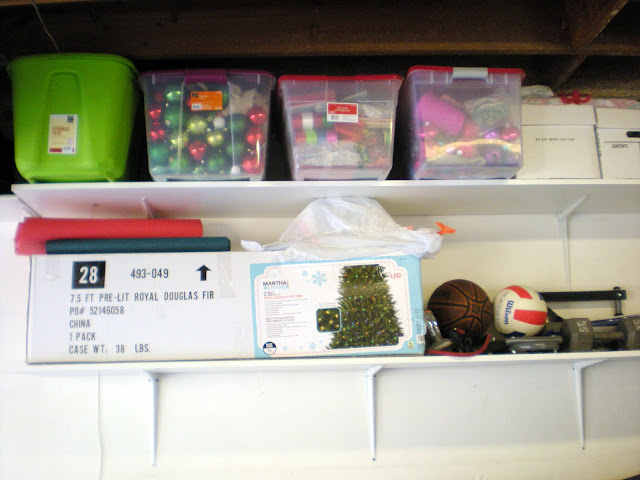
Sadly that was only half the battle. We still had to go through and organize all of our stuff. All of the Christmas stuff went on our newly repositioned shelves. The rest of it is on the higher shelf pictured above. We have a lot of Christmas stuff. The (under used) sports equipment joined it. Our trash cans went underneath now that they fit.
Jon's tools went on the shelf that used to be blocked by a mountain of stuff. All of our paint cans are on the shelf above it. My craft stuff is on the floor so I don't have to ask Jon to get it down for me.

We parked the cars back inside and we were finally done! After 7 hours. 7 long, sweaty hours.
In the end we had another car load of stuff for the Salvation Army and about 5 boxes of stuff that need to find a place inside our house. But we ignored that new pile. We earned a fatty dinner and ice cold beer(s). Seriously.

At least this entire project was free since we reused all the shelves.
I had always wanted to reposition the height of the shelves but its one of those projects that sat on the back burner. Especially in the Wedding- Birthday- Holidays craze that made up our first few months in the house. And then it was too cold to be out there. I don't do cold.

When autumn rolled around last year I put away all of our fans. I washed and covered them with trash bags and placed them in the garage on the shelves, leaving us plenty of space to get into and around our cars. Then the holidays came. All of our new Christmas stuff got thrown in the garage in a haphazard way but it was still maneuverable. Then we bought a new bed frame we didn't have a mattress for yet. Super tight squeeze but still manageable.
Eventually our garage was full of stuff everywhere. On our washer and dryer. On the floor between the cars. You name it, we had stuff on it.

So Saturday rolls around and we get started. First Jon swept the entire garage and we took everything off the shelves.

Then Jon removed the shelves. One side of the garage only had one shelf and we wanted to move it to other side. We left this wall blank (we might add another shelf one day but it would depend on our new car, which we'll buy one day, and its dimensions). We left the brackets attached to the shelves. We figured it had already been adjusted to match the width of the studs. How wrong we were....

We used me as a tool of measurement. We compared me against the cars and used that to set the new height for our shelf. Told you that's how we roll!

Then the real fun began. Jon was trying to hold up the first shelf while drilling it into the wall. That didn't work so well. So I decided to help by trying to hold it up while Jon drilled. And it still didn't work! The shelf kept shifting and we couldn't get it level.

After two failed attempts I said "I'll drill. You hold it up." Jon looked at me in disbelief and said "Are you sure? Do you even know how to use a drill?" "No, but I can do it." And I DID IT. Such a big moment for me.
Yes, you read that right. I used a power drill. I did it (mostly) right and I liked it! You know I don't do manual labor. I must be growing up.

Check me out drilling! That's right- I included proof!
We figured the next two shelves would be easier to install since we now knew what we were doing. We couldn't have been more wrong. Jon's stud finder was totally failing us. I don't know why it was throwing a temper tantrum. It kept giving off inconsistent readings and so not all of our screws were hitting studs. It was super important that we hit studs since garage shelves need to be heavy duty.

It took several tries but we FINALLY got there.


Sadly that was only half the battle. We still had to go through and organize all of our stuff. All of the Christmas stuff went on our newly repositioned shelves. The rest of it is on the higher shelf pictured above. We have a lot of Christmas stuff. The (under used) sports equipment joined it. Our trash cans went underneath now that they fit.

Jon's tools went on the shelf that used to be blocked by a mountain of stuff. All of our paint cans are on the shelf above it. My craft stuff is on the floor so I don't have to ask Jon to get it down for me.

We parked the cars back inside and we were finally done! After 7 hours. 7 long, sweaty hours.
In the end we had another car load of stuff for the Salvation Army and about 5 boxes of stuff that need to find a place inside our house. But we ignored that new pile. We earned a fatty dinner and ice cold beer(s). Seriously.
Orange You A Failure?
Thursday, April 18, 2013
We painted our teeny, tiny half bath orange. Like trick-or-treat orange. And we freaking LOVE IT.
One day I looked at Jon and said "I think we should paint the half bath orange." Jonathan "hmmmm, yeah, that could be cool." And thus the orange bathroom was born.
Once again we have the awesome people at Design Seeds to thank for our color inspiration. And Pinterest. Thank you Pinterest a million times.
I found this Autumn inspired color palette board on Pinterest.
And this cool stencil idea.
Naturally, I wanted to merge both ideas and test it out in our half bath. Why? Size. Its a small space. I think bold colors look best in tiny spaces because they're unexpected and because it's easy to fix in case it doesn't go right. Not all of my bright ideas pan out. Case in point, this bathroom. But we'll get to that in a bit.
First Jon and I went our happy place! Home Depot (Seriously, they know us there). And began comparing all the orange paint chips against the picture on my phone. I wanted to go with a terracotta orange, lighter and softer than the orange we ended up with. Jonathan selected the Halloween (that's really the name of the color) orange. All you married people know comprise is key and since I pick the general design of our projects, its only fair that Jon has final say on the color and items that go into a room.
$30, my dad's (have you noticed he's the official helper?) help and a bucket of paint later we have a super orange bathroom!


In the midst of all the paint selection (it's actually a longer process that it would seem), I found a Moroccan inspired stencil that was almost exactly what I had envisioned. Hobby Lobby loves coupons so I got it for 40% off. I. LOVE. A. DEAL.
After the painted had fully dried I went in I tried to stencil the wall. I had read on a few blogs and DIY sites that some people had just used a paint pen to outline and color in the stencil lines. I have loads of paint pens left over from my sorority days and figured this would be a time consuming but not hard project. I was mostly right. It wasn't hard but it SO did not turn out like I thought it would. See?

It all looks good from far away. Up close it looks TERRIBLE.
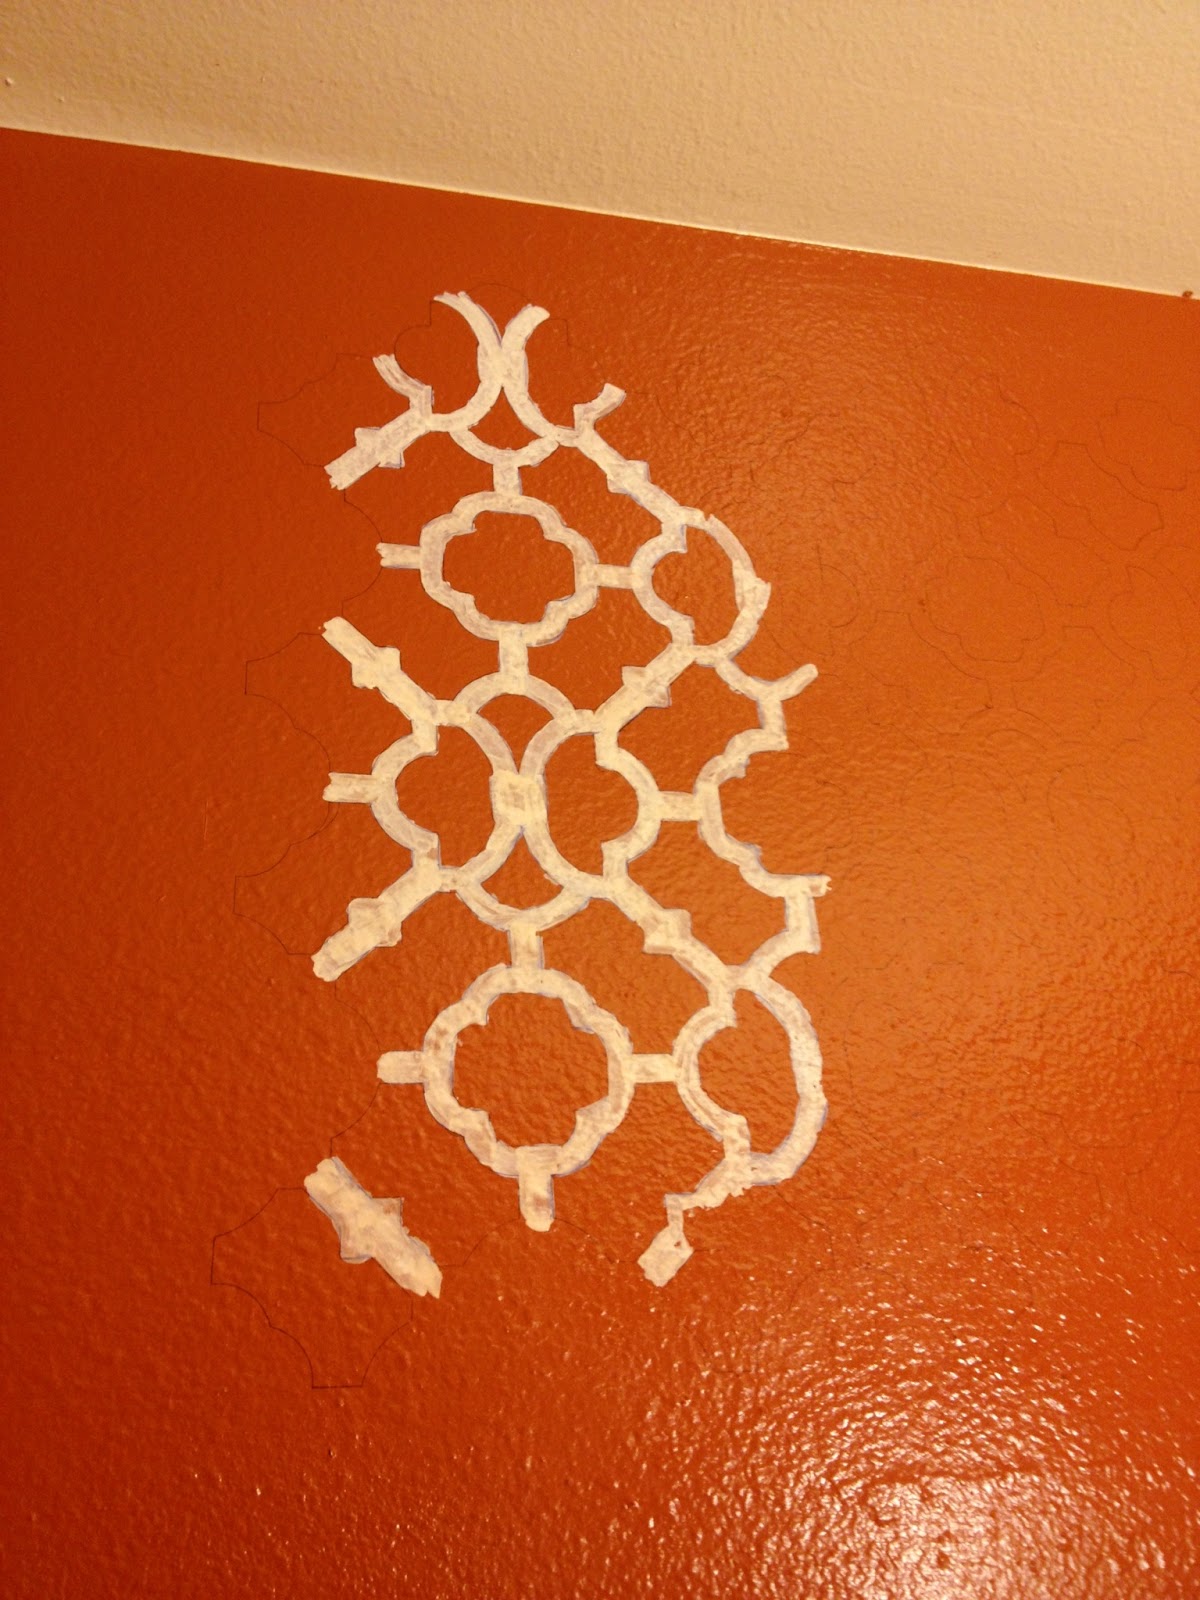
I'll be honest. I hated it. Jon kept saying "it looks fine honey, just rustic." I'm not really sure what he meant but that's not what I was going for. So Jonathan painted over it. Just covered up my mess and moved on.
I think it looks better this way. Really though.
Fine! To be completely honest that's what I've been telling myself to help deal with my epic failure. We could have tried to make it happen by repainting the whole room white and then stenciling with orange paint buuuut that would have required more paint and putting off finishing the bathroom for another week. And neither one of us were willing to do it. I think Jonathan would have looked at me and said "You cray cray" (he likes to quote me). Plain orange it is!
Moral of the story: one bold idea at a time. We still get compliments on the color so we must have done something right. And I'm not totally giving up on the stencil. After my massive fail I asked Jonathan if we could use the stencil in the dining room and he asked if I was going to do it. Obviously I said yes but I'm not so secretly (this is online after all) hoping that he'll continue to be the best husband ever and help me out when the time comes. Don't worry Jon, we have plenty of time!
One day I looked at Jon and said "I think we should paint the half bath orange." Jonathan "hmmmm, yeah, that could be cool." And thus the orange bathroom was born.
Once again we have the awesome people at Design Seeds to thank for our color inspiration. And Pinterest. Thank you Pinterest a million times.
And this cool stencil idea.
Naturally, I wanted to merge both ideas and test it out in our half bath. Why? Size. Its a small space. I think bold colors look best in tiny spaces because they're unexpected and because it's easy to fix in case it doesn't go right. Not all of my bright ideas pan out. Case in point, this bathroom. But we'll get to that in a bit.
First Jon and I went our happy place! Home Depot (Seriously, they know us there). And began comparing all the orange paint chips against the picture on my phone. I wanted to go with a terracotta orange, lighter and softer than the orange we ended up with. Jonathan selected the Halloween (that's really the name of the color) orange. All you married people know comprise is key and since I pick the general design of our projects, its only fair that Jon has final say on the color and items that go into a room.
$30, my dad's (have you noticed he's the official helper?) help and a bucket of paint later we have a super orange bathroom!
In the midst of all the paint selection (it's actually a longer process that it would seem), I found a Moroccan inspired stencil that was almost exactly what I had envisioned. Hobby Lobby loves coupons so I got it for 40% off. I. LOVE. A. DEAL.
After the painted had fully dried I went in I tried to stencil the wall. I had read on a few blogs and DIY sites that some people had just used a paint pen to outline and color in the stencil lines. I have loads of paint pens left over from my sorority days and figured this would be a time consuming but not hard project. I was mostly right. It wasn't hard but it SO did not turn out like I thought it would. See?
It all looks good from far away. Up close it looks TERRIBLE.
I'll be honest. I hated it. Jon kept saying "it looks fine honey, just rustic." I'm not really sure what he meant but that's not what I was going for. So Jonathan painted over it. Just covered up my mess and moved on.
I think it looks better this way. Really though.
Fine! To be completely honest that's what I've been telling myself to help deal with my epic failure. We could have tried to make it happen by repainting the whole room white and then stenciling with orange paint buuuut that would have required more paint and putting off finishing the bathroom for another week. And neither one of us were willing to do it. I think Jonathan would have looked at me and said "You cray cray" (he likes to quote me). Plain orange it is!
Moral of the story: one bold idea at a time. We still get compliments on the color so we must have done something right. And I'm not totally giving up on the stencil. After my massive fail I asked Jonathan if we could use the stencil in the dining room and he asked if I was going to do it. Obviously I said yes but I'm not so secretly (this is online after all) hoping that he'll continue to be the best husband ever and help me out when the time comes. Don't worry Jon, we have plenty of time!
We are so Shelf-ish
Tuesday, April 16, 2013
Being newlyweds means that we have a ton of mismatching Ikea furniture. Obviously I’m trying to replace and upgrade ALLof our stuff but since we have been doing so much to the Man Cave Jon and I decided to get a new media stand. After our bed frame this is the first piece of furniture we’ve bought.
The old one was too small and the TV sat way too low.

I had been lusting after one of those bookshelves all over Pinterest that are open and have different compartments. Thanks to Pinterest and my online shopping addiction I found this beautiful (and affordable!) one at Wayfair.com (my new favorite online store just in case you wanted to buy me something).

The plan was to use as entertainment center but I don’t like when you can see all the cables so I thought it would be cool to cover the back with some painted plywood.

Once it arrived and Jonathan assembled the bookshelf. And it was Home Depot time (again) to get some plywood. They have prepared wood that just had to be cut to size. We selected Packers green paint and I painted the panels. Jon attached them to the back and we were done!
Once it arrived and Jonathan assembled the bookshelf. And it was Home Depot time (again) to get some plywood. They have prepared wood that just had to be cut to size. We selected Packers green paint and I painted the panels. Jon attached them to the back and we were done!

We chose Jonathan’s football helmet, a huge bottle of champagne, our favorite books that makes us look smart and fancy and favorite movies to display. Even though it’s the Man Cave, all of my Harry Potter books and movies and Law and Order: SVU DVDs are on it. Thanks Jon!
Funny story: When Jon was nailing the panels to the bookshelf he kicked me out of the Man Cave because I was telling him (really annoyingly I’ll admit) how I wanted it done. I had to pound on The door for him to let me back in. He has no recollection of the event but I swear that it happened.
Initially we were going to put all of our DVDs on the shelf but we have way too many. Our solution was to build shelves in the closet. The idea was mine and the execution was Jonathan. So does that mean the solution is mine? I just want to give credit where credit is due. ;)

The closet in this room has a little cut out that’s about 11 by 11 inches. You can’t hang clothes there and that width works really well for DVDs or books. Jon measured and figured out how many shelves we could install. Back to Home Depot. We purchased pretreated white boards (the kind that are made for closets), had the lovely folks at Home Depot cut them to size and used little screws to attach the brackets to the wall and wood. We ended up making trips to two different stores because we cleaned them out of shelf brackets.
Here is the end result:

Total there are 10 shelves and its holding the majority of our DVDs and Jon video games. Best use of an awkward and tiny space.
Now please ignore our mess in the rest of the closet. Thanks!
Now please ignore our mess in the rest of the closet. Thanks!
Jon 1, House 0
Thursday, April 11, 2013
Leaky sinks seem to be our thing. In the short time we've lived in our home we've had two leaky sinks (you can read about our stupid kitchen sink here) and one leaky hose spout thing. Is that what its called? I should ask Jon.... But our first leaky sink run-in was in the half bath.
The Man Cave bath may have been the first room makeover we did but our half bath downstairs is the room we've done the most work in. It's right next to the front door, a closet, and our stairs. This means it was built into the smallest space possible. We used me as a unit of measurement (that's how we roll in this house) and since I can't lay down completely in it, I would guess it's only about 3 and a half feet by 4 feet compared to my 5 feet height. Tiniest bathroom ever.
The vanity in the room was way way way too big for the space and I felt like the door was going to hit me in the back every time I washed my hands in there. If it was too cramped for me I can't imagine how everyone else felt using it. Thinking of ourselves and guests (and future home buyers!), Jon and I decided to replace it with a pedestal sink.
We checked the selection at Home Depot and Lowe's and Jonathan realized that it wouldn't be as easy as he initially thought. Once he removed the old vanity and consulted with Google he determined that installing a pedestal sink would involve opening up the wall and doing some major changes to the pipes.
I was against putting a hole in our wall for something that we didn't absolutely have to do. Its a room we hardly use and its not like this is our forever home. Jonathan was all about opening the wall. Why? Because of the piece of tile sticking out of the wall. Yes, some previous owner had stuck a long piece of tile IN THE WALL to tilt the water shut off valves up. Behold the photographic evidence:
Let's pause for a moment and shake our heads in disbelief. Done? Ok.
Jon wanted to redo whatever had been done previously because he figured that it probably wasn't done right. I thought that it was weird but it didn't seem like anything was wrong so why make a mess? We had already vetoed the pedestal sink idea. After a loooong discussion Jon pulled the piece of tile from the wall and left it as is. Don't worry, everything seems to be okay back there... Fingers crossed!
Back at Lowe's (Home Depot let us down, I took it pretty hard) we finally bought a new vanity and sink. The new one was just as long as the old one but not as wide so we gained about 4 inches in between the sink and the door. The only problem was the knobs on the water shut off valves were oval and long which prevented the new vanity from sliding up against the wall on the right side of the cabinet. Jon said he would replace the knobs with smaller new ones and that would solve the problem. Not so much.
He got to work switching out the knobs and it went like this: Jon replaces the knobs. Water back on. Drippity drip drip. Water off. Tighten stuff. Water back on. Leak leak leak. Water off. Home Depot. Repeat once.
Jonathan says:
"If I learned anything, replacing a compression ring can be a pain the ass. For those who don't know, a compression ring fits around the copper water pipe and is the go between for the water shut off valve at the end of the pipe and the nut that holds it. Well, after a compression ring has been in place for years... it doesn't want to budge. The only way to get it off is to cut the copper pipe behind the ring (easy way) or very slowly saw a groove into the metal ring until you can fit a flat head screwdriver into said groove and essentially twist the driver to snap the ring (hard way). Well, we didn't have any spare length on the copper pipes, so I had fun with the hard way."
At this point its almost midnight. Our conversation goes like this: Jon- "I don't know if I can fix it. I'm just going to put a bucket underneath the spout." Me- "Dude, there's a lot of water coming out. Don't you think the bucket will fill up while we're at work?" Jon- "Fine. I'll shut the water off." Me- "I still have to shower!"
Half an hour later I hear "JON 1, HOUSE 0! I FIXED IT BABE!"
I got to shower that night.
The Man Cave bath may have been the first room makeover we did but our half bath downstairs is the room we've done the most work in. It's right next to the front door, a closet, and our stairs. This means it was built into the smallest space possible. We used me as a unit of measurement (that's how we roll in this house) and since I can't lay down completely in it, I would guess it's only about 3 and a half feet by 4 feet compared to my 5 feet height. Tiniest bathroom ever.
The vanity in the room was way way way too big for the space and I felt like the door was going to hit me in the back every time I washed my hands in there. If it was too cramped for me I can't imagine how everyone else felt using it. Thinking of ourselves and guests (and future home buyers!), Jon and I decided to replace it with a pedestal sink.
 |
| wouldn't a pedestal sink look so much better? |
 |
| See how small the room is? |
 |
| Look right behind the silver oval knob |
Jon wanted to redo whatever had been done previously because he figured that it probably wasn't done right. I thought that it was weird but it didn't seem like anything was wrong so why make a mess? We had already vetoed the pedestal sink idea. After a loooong discussion Jon pulled the piece of tile from the wall and left it as is. Don't worry, everything seems to be okay back there... Fingers crossed!
Back at Lowe's (Home Depot let us down, I took it pretty hard) we finally bought a new vanity and sink. The new one was just as long as the old one but not as wide so we gained about 4 inches in between the sink and the door. The only problem was the knobs on the water shut off valves were oval and long which prevented the new vanity from sliding up against the wall on the right side of the cabinet. Jon said he would replace the knobs with smaller new ones and that would solve the problem. Not so much.
 |
| Not lying when I said small! |
Jonathan says:
"If I learned anything, replacing a compression ring can be a pain the ass. For those who don't know, a compression ring fits around the copper water pipe and is the go between for the water shut off valve at the end of the pipe and the nut that holds it. Well, after a compression ring has been in place for years... it doesn't want to budge. The only way to get it off is to cut the copper pipe behind the ring (easy way) or very slowly saw a groove into the metal ring until you can fit a flat head screwdriver into said groove and essentially twist the driver to snap the ring (hard way). Well, we didn't have any spare length on the copper pipes, so I had fun with the hard way."
At this point its almost midnight. Our conversation goes like this: Jon- "I don't know if I can fix it. I'm just going to put a bucket underneath the spout." Me- "Dude, there's a lot of water coming out. Don't you think the bucket will fill up while we're at work?" Jon- "Fine. I'll shut the water off." Me- "I still have to shower!"
Half an hour later I hear "JON 1, HOUSE 0! I FIXED IT BABE!"
I got to shower that night.
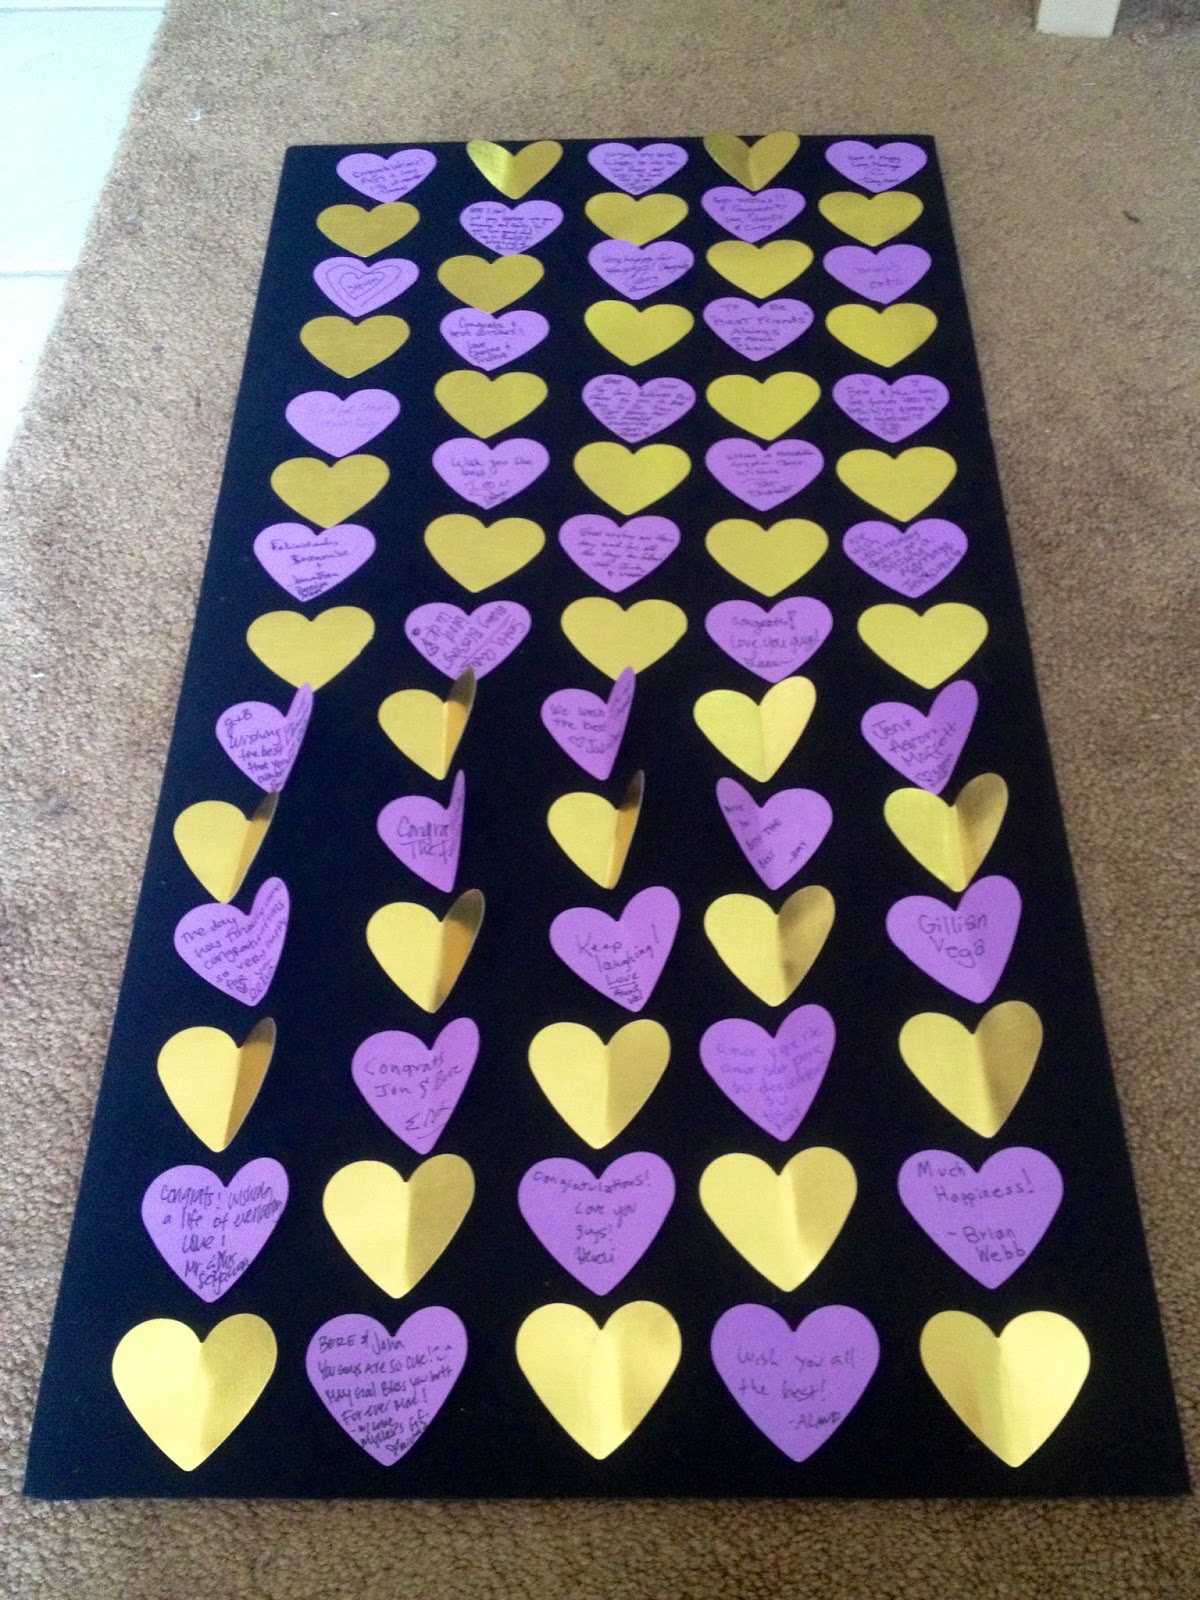
You Heart Us
Tuesday, April 9, 2013
Even though I like to get my craft on I didn't do a single crafty thing for our wedding. Jonathan and I assembed the invitiations but that was about as complicated as we got. However, I did have an idea to DIY our guest book. Thank you Pinterest!
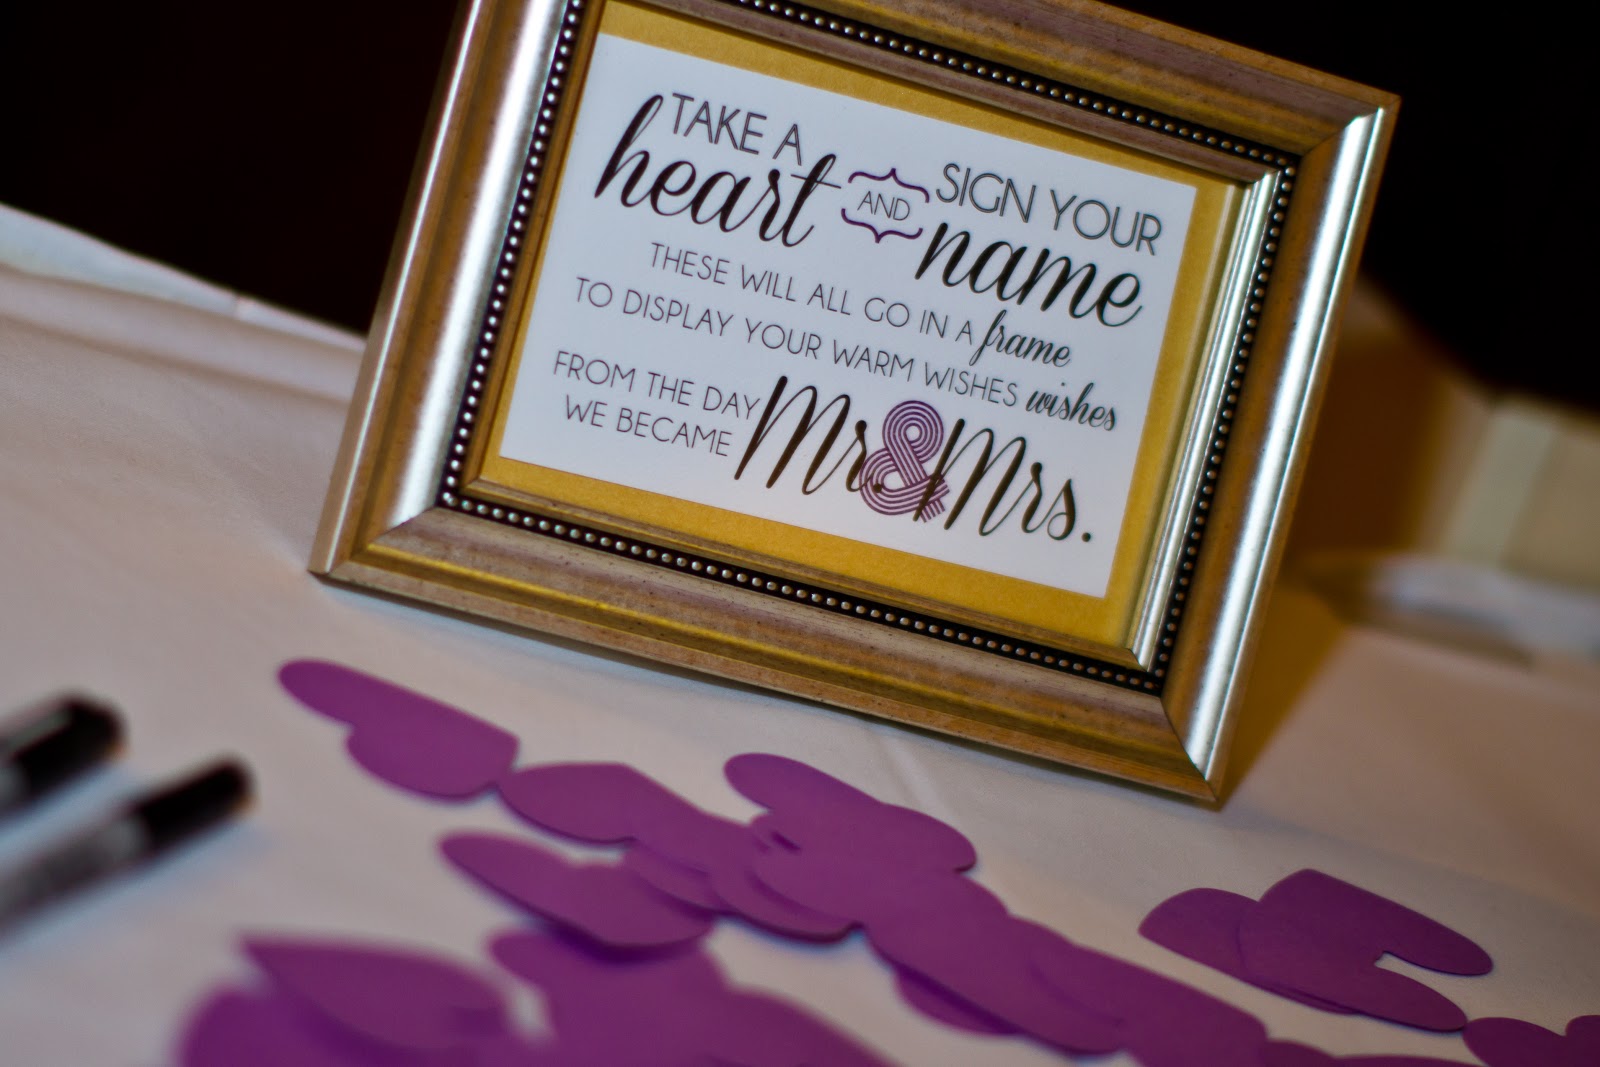


The photo has kraft hearts and heart cut outs of a vintage dictionary assembled as 3D art. I actually wanted to order one from the seller but the only option was to go with the exsisting colors and paper. I figured I could make something similar that would match our wedding colors and would fit in to our home.
With leftover scrapbook paper from my bridal shower and some new metallic gold paper I used a heart punch out and cut out tons of little hearts. I saved all the gold ones and put all the purple ones out at our wedding. We asked all of our guests take to a heart and sign it.
With leftover scrapbook paper from my bridal shower and some new metallic gold paper I used a heart punch out and cut out tons of little hearts. I saved all the gold ones and put all the purple ones out at our wedding. We asked all of our guests take to a heart and sign it.
All the hearts sat in one of our closets for almost 6 months. I am a slacker bride. But doesn't every new wife need time to recover after the wedding? As our six month anniversary is approaching I FINALLY decided to put it all together. Intially I wanted to use some leftover MDF from our Man Cave bookshelf project but I couldn't fit all of the hearts on it. Jonathan said we could just leave some off. Yeeeeaaaahhhh, no. Michaels saved the day with their sale on shadow boxes! I picked one for $30 (it was 50% off!), laid out all the hearts and played around with the layout I wanted.
Jonathan watched the Laker (ew) game while I worked.
I slighty folded the hearts in half, glued them down...
And stuck the whole thing back in the frame.
LOVE IT. I love that its something we can hang in our home (forever hopefully!). I didn't want a book that would sit in a closet or under our coffee table unseen. All of our favorite people and their well wishes for our marriage are on display and its so sweet that we can literally see the love everyday.
P.S. Yes, its on the floor in the photo. We haven't decided where to hang it yet!
Our First Project
Sunday, April 7, 2013
The guest bath (the one off the ManCave) was actually the first room we redid. It seems like such a strange place to start considering we don’t really use it. I’d like to say that I was trying to get everything ready for our eventual guests but in actuality we started in that room because it didn’t really need a whole lot. Thanks to our awesome friends and family we got most of the stuff for that room for our wedding. All we really had to do was paint and add some shelves.
Thanks to one of those Design Seed color boards on Pinterest I found the color palette we I wanted to use in the bathroom and the Man Cave.
Since the entrance to the bath is inside the Man Cave it only makes sense that the colors should go together. I thought i twas going to be really hard to convince Jon to go with such a bold color but I was so wrong. In fact he picked the shade of navy we went with.
Since this was our first paint job this is when we began to notice that the paint in all the rooms was badly done. I didn’t think it was possible to mess up paint this much but it is. The mirror, light fixture, sink, towel bar, outlet plates and bathtub all had dried paint on them. Lovely. It took awhile but we were able to scrub a lot of it off. We didn’t really want to replace anything major in here so we really tried to remove as much paint as possible.
We taped off everything and got to painting. I think this is the only room in the house that I actually helped paint. I use the word helped loosely because I’m not sure I was that helpful. If I remember correctly Jonathan had to go over my strokes… but it’s the thought that counts, right?

Fun fact- it’s really hard to paint the area behind the toilet. It’s also hard to paint up to the ceiling in the tub. Even with a ladder.

The paint in here is not even close to perfect. After we were “done” we knew that we’d have to go back and fix the lines on the ceiling. It’s been a few months and we still haven’t done that. We’ll get around to it one day. Maybe.
Once the paint dried Jonathan installed two shelves above the toilet for me. After he did his thing I was able to do mine. I hung up the shower curtain, put up the towels and made the shelves look pretty. It’s really hard to think of decorative stuff to put in a bathroom. I’ve never noticed what other people have in their bathrooms and I couldn’t really find anything so I made my own. The weirdest thing in there? The wine bottle thing. I stuck some curly willow from our wedding flowers into an empty glass wine bottle from our rehearsal dinner. We get tons of compliments on it so it must be nice. And it was free and easy. The round medallion metal thing is a recent addition. I’m always looking for new house stuff!
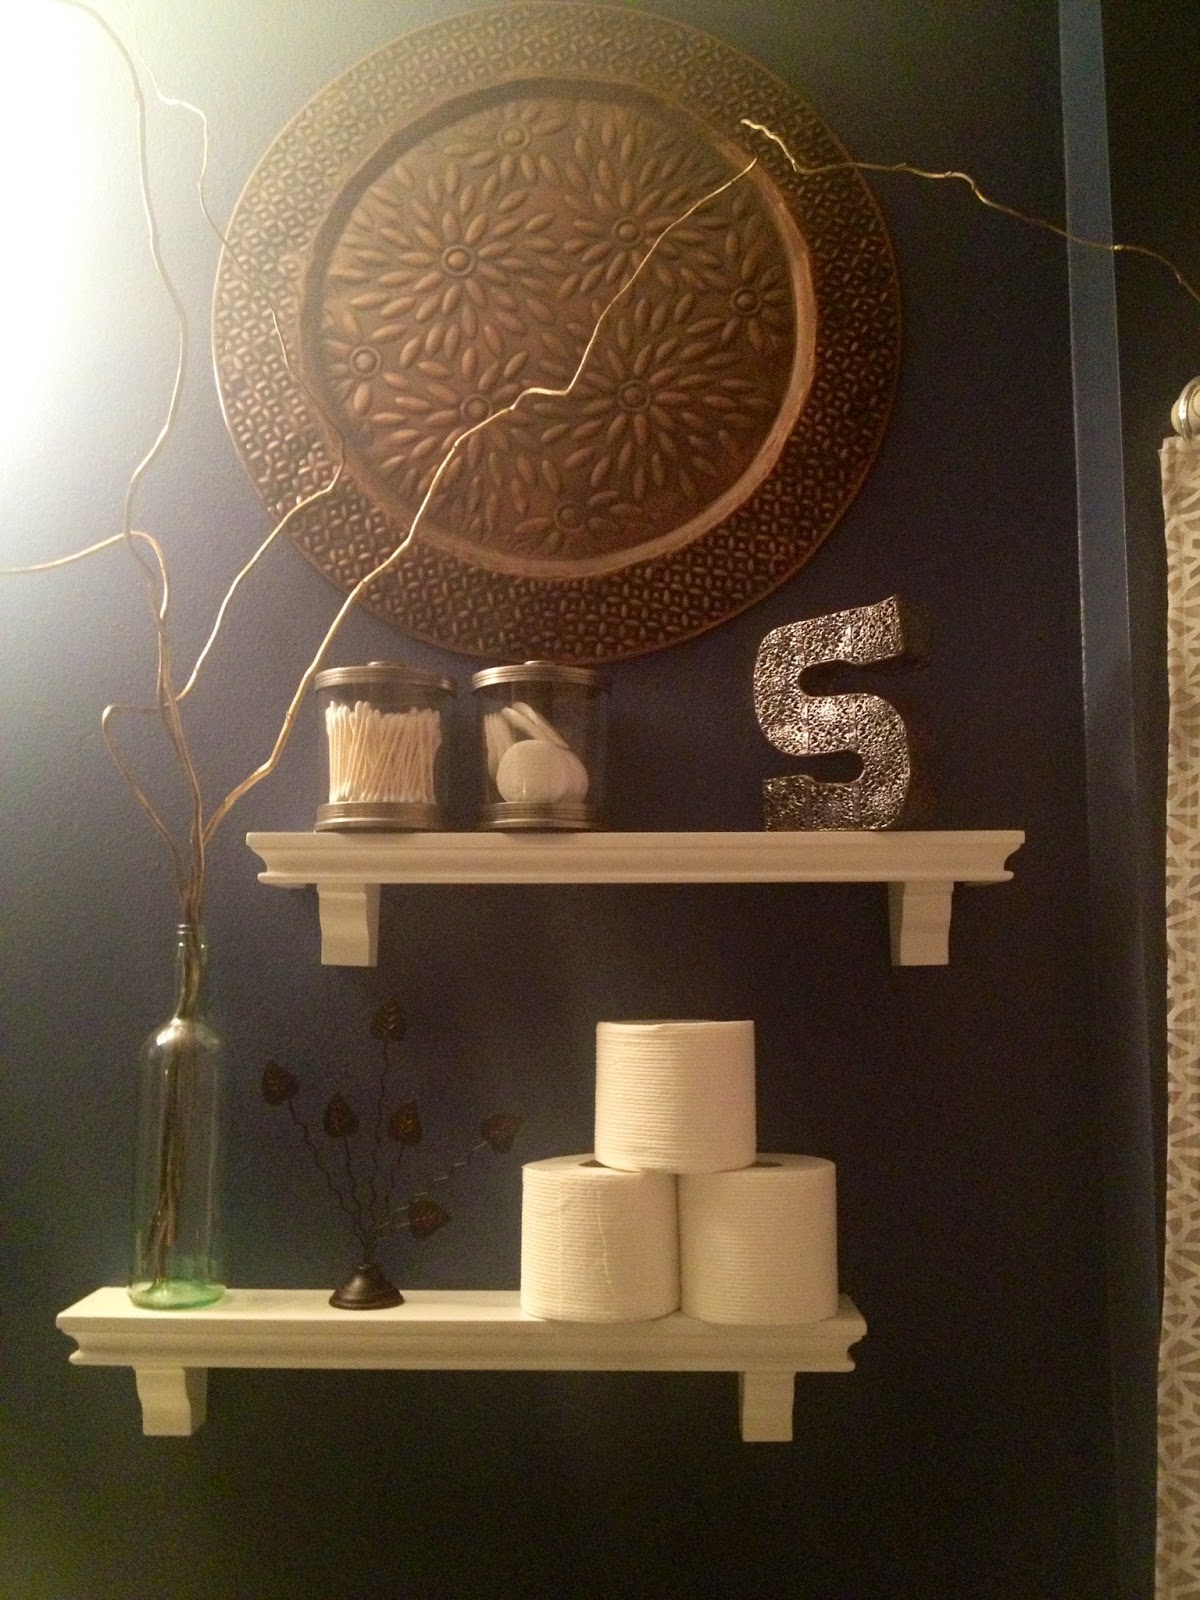
I LOVE the shower curtain.
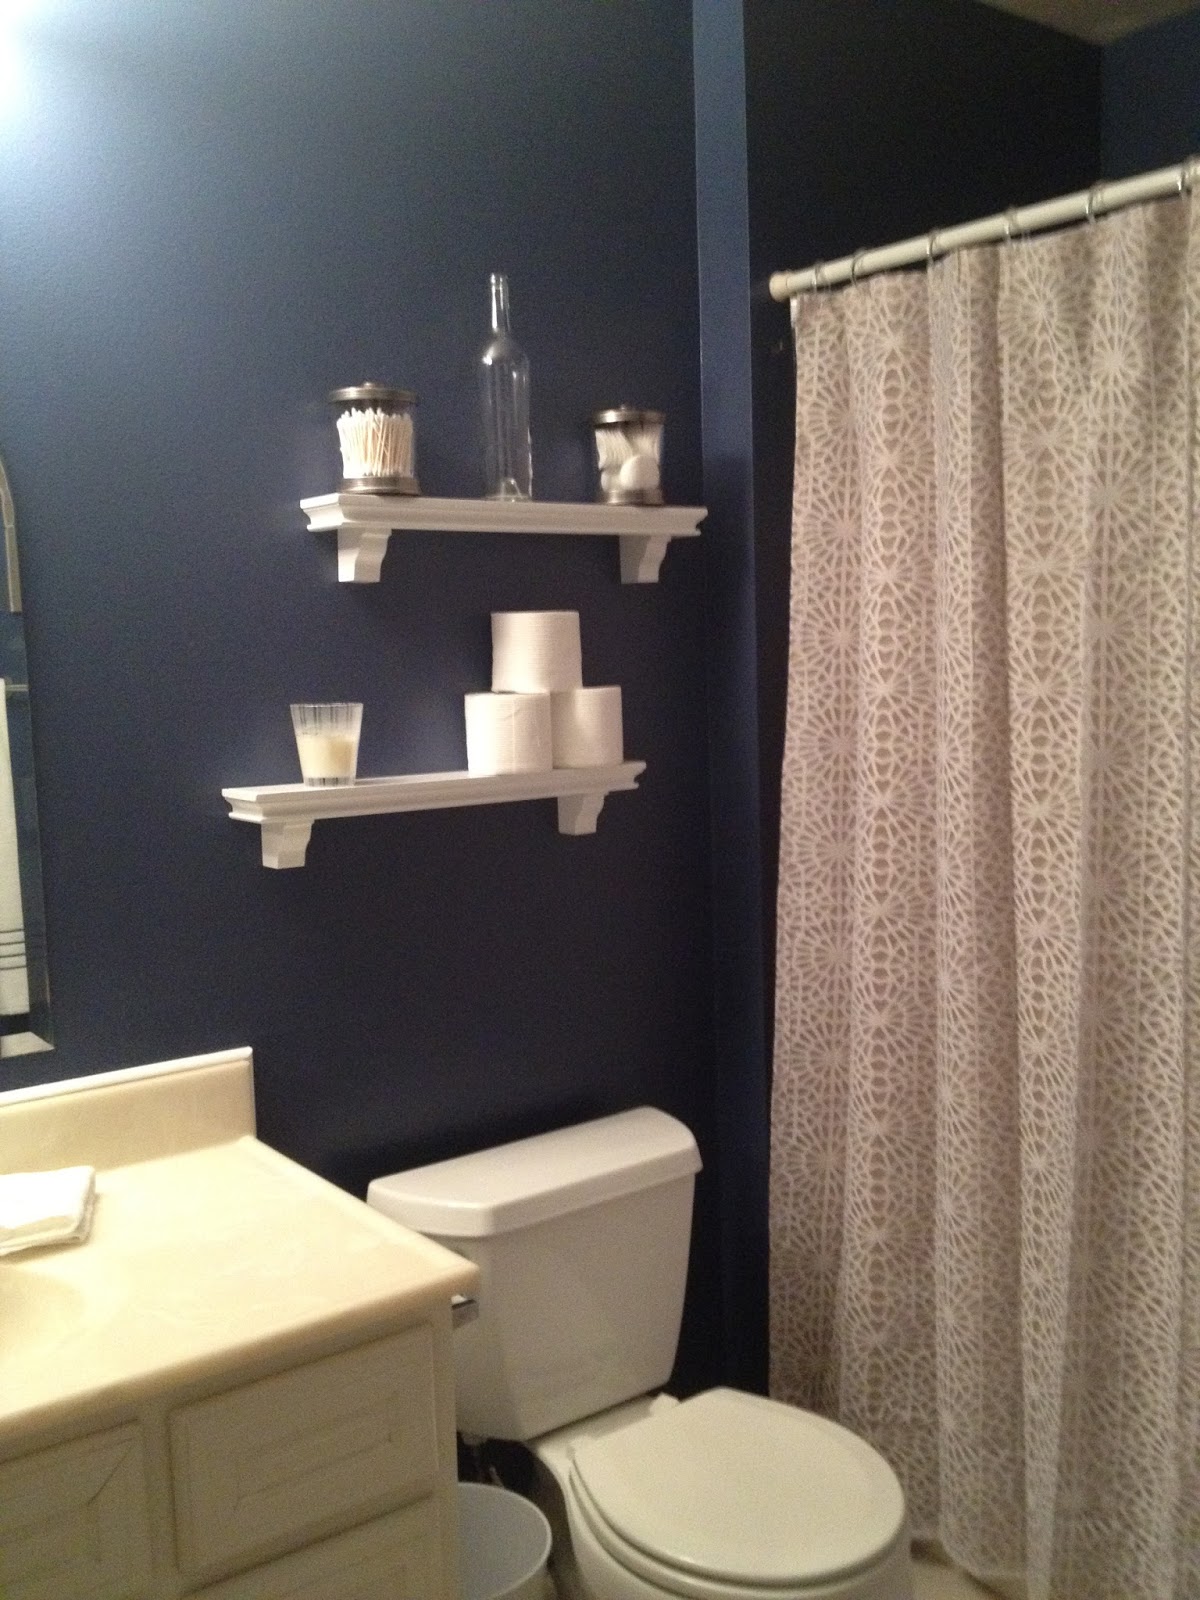
My favorite thing in the bathroom is the wee wee dance (what else would you call it?) canvas. Why? Because I made it and it's so funny.

My awesome friend Amy and her husband cut the silhouette on her cricut and I used a paint pen to color in the people. This is the view from the toilet. Totally appropiate right?
My awesome friend Amy and her husband cut the silhouette on her cricut and I used a paint pen to color in the people. This is the view from the toilet. Totally appropiate right?
 |
| Inspried by this version on Etsy |
I wish I had a picture of the before when it was all white. Paint, shelves and one weekend made a humongous difference. Now for some guests!
The Sinker
Saturday, April 6, 2013
Sometimes it feels that just as we fix one problem another pops up. Thursday night Jonathan and I came home from running errands to a leaky sink. I went to take out the trash and noticed the box of trash bags was wet. Immediately a red flag went up and I started to move things around. And once I saw what was awaiting us this was my face...


because this is what I found...
MOLD. BLACK MOLD. Jon came down to check it out and confirmed my worst fears. We had to clear everything out and move it to the garage (all that stuff will have to super cleaned before it comes back inside). After a quick google search I bust out the gloves and bleach. Jon was a little apprehensive about the bleach for my safety (isn't he sweet?) but I wanted to make sure the mold would DIE. It actually came out easier than I thought it would but I could only scrub a portion of it. The smell of the bleach got to me and my arms aren't long enough to reach to the other end of the cabinet. We opened up all the windows and let it air out before Jon took a turn. He had a little issue and inhaled some bleach. In between gags and coughing he croaked out "This is what I was afraid you were going to do!" But I didn't, you did! Don't worry, he's fine and the mold is gone!
I'm a little concerned that the mold is seeping into the space where the dishwasher is located. See in the photo how the wiring is coming thought the cabinet? That's the dishwasher. Jon removed the stuff underneath it and it appears to be okay but we're debating having someone to come out and look at it.
Luckily, Jon thinks he found the source of the leak and applied some clear caulking around it. We haven't used it for the last couple of days (I really wanted the cabinet dry out) but we'll probably try it out this weekend and hope for the best! Cross your fingers!
Manly Makeover
Tuesday, April 2, 2013
When we first moved in the extra bedroom was a catchall. We just tossed stuff in there and closed the door. However, being the awesome (and modest) wife that I am, Jon & I decided to turn that room into Jon's man cave. See I really don't mind football, in fact I've become a full fledged Packers fan but I HATE the Lakers. And I don't really want video games in our bedroom or living room SO Jon gets a man cave. Maybe in our next home I'll get a craft room where I can watch Law and Order: SVU marathons. A girl can only hope....


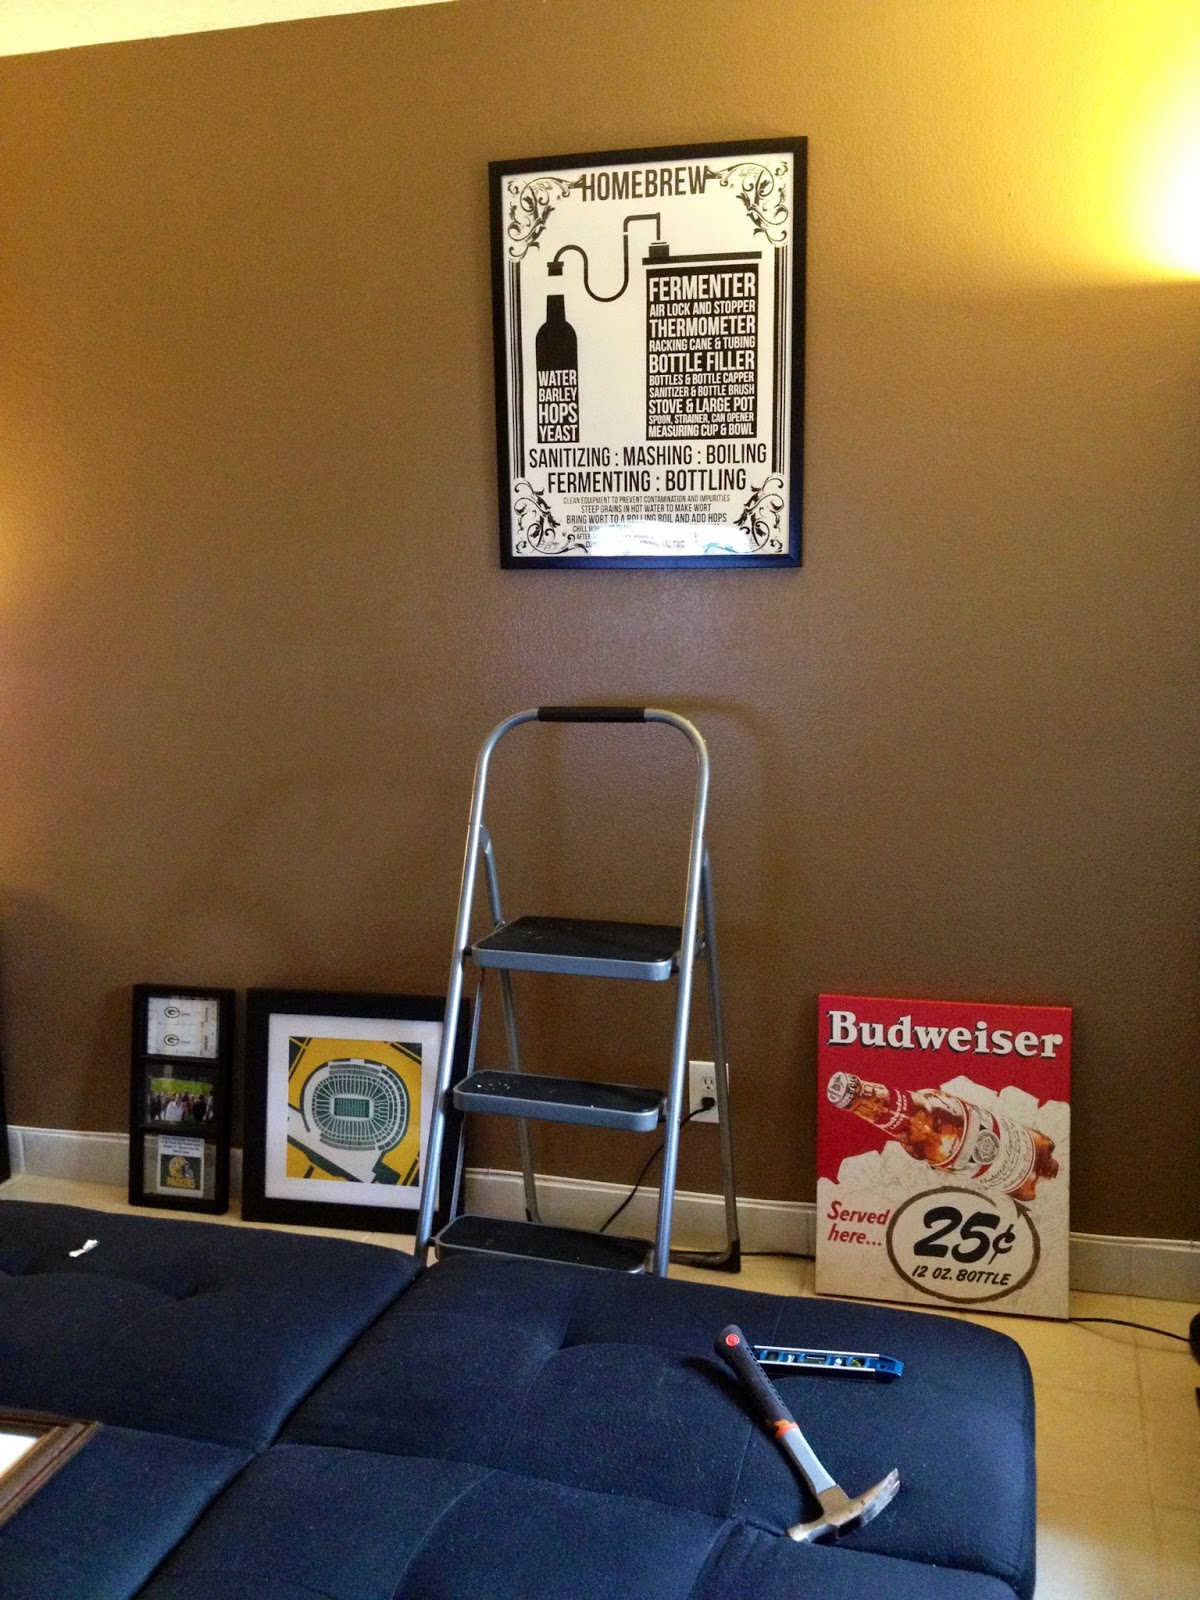


All the walls in the house are terrible. Whoever painted in here last just threw paint up on the walls. I don't think they covered anything. There's paint on the fixtures, mirrors and trim. The last couple of rooms we've done haven't been too bad with the gross old paint but the man cave was in rough shape. The outlet plates were painted to the wall. We ended up cutting them off the walls. See that huge chunk of dried paint? Ugh.
Luckily the rest of the painting on Saturday went by pretty quickly. Thanks Dad & Erick!
Sunday morning Jonathan and I replaced all the outlet plates with new ones and moved all the furniture back. At this point I was a little concerned the color was too dark for all the black furniture in the room but figured I'd better wait until all the artwork was on the walls before totally freaking out and telling Jon we needed to change something. I was off work today (thanks Cesar Chavez!) and decided to try to hang the frames myself. When I told Jon what my plan for today was he seemed a bit skeptical but I assured him if it was too heavy or something I'd wait for him instead of poking a bazillion holes in the wall.
I have been slowly accumlating manly artwork. Which is harder than it sounds. We wanted cool, not tacky and I think we chose pretty well. I bought two beer related prints and added some Green Bay Packers inspired pictures and art. My personal favorite is a green and yellow map of Lambeau Field. I also painted an old football helmet picture collage Jon's dad gave him years ago white.
I laid everything out on the futon and then just started eyeballing it on the wall. I started from the middle and worked my way out. I didn't measure at all. I just went by what I thought looked good.
Jonathan wasn't on board at first but I think it's because he was seeing it via text and it just looks so much in better in person.
I LOVE the way it turned out. There's only picutre that's missing and sadly its my favorite. The frame came with the little hook to hang it but it's not attached to the actual frame. I was afraid of denting it or somehow ruining the glass (because that's totally somethng I'd do) so I left that one for Jon to do. Hopefully he'll hang it tomorrow and the man cave will be almost done!
Isn't it pretty? But in a manly way, right?
Subscribe to:
Posts (Atom)