We Think We're Funny: June 2013

Friday, June 28, 2013

Jonathan and I shared some of our funny (at least to us) conversations last month. We liked it so much we decided to do it again each month from now on.

Until we no longer think we're funny....

In regards to our shutter project:
Jonathan: This is the worst project we've ever done! This is my most hated project so far.
Berennisse: What was it before?
Jonathan: Nothing. I knew this was waiting for me.

Discussing watching The Last Stand & painting the entryway:
Jonathan: Want to watch the movie and then paint?
Berennisse: Why don't we watch the movie while we paint?
Jonathan: What! I'm not going to paint while I watch Schwarzenegger. He deserves my full attention!

While cleaning our bathroom:
Jonathan: Your hair is beautiful but its from the devil!

After viewing our shutter recap video:
Berennisse: My favorite part is where you said, "got your approval."
Jonathan: I said that? Damn.

While assembling the dining chairs:
Berennisse: Babe, why do two of those chairs have holes on the seats?
Jonathan: They were $15! They're cheap.
---Two days later---
Berennisse: Do you think those holes on the chairs are where the arms go?
Jonathan: Ohhhh, you're right!

After I caught him wearing his birthday cheesehead while playing video games:
Berennisse: Why are you wearing your cheesehead?
Jonathan: I just felt like wearing it.
Berennisse: Isn't it too early for football?
Jonathan: Its never too early for football!

Jon's 28 Years on the Planet

Wednesday, June 26, 2013

Friday was Jonathan's 28th birthday!


We celebrated quietly at home. His mom came over and we ordered in. She baked a delicious cake. It was a Victorian sponge cake with cream cheese frosting in between the layers topped with whipped cream and berries. It was as delicious as it sounds. Wish I had gotten a close up of the cake. 

My parents had already surprised us with our beautiful new shutters. My brother came by and surprised Jon with a Green Bay Packers Cheesehead. Obviously he loves it. He immediate stuck it on his head and said "this will make game days great!" 

I think that may have been his favorite gift. I caught him wearing it while playing video games in his man cave


The Shutter Story: The Surprise

Monday, June 24, 2013

Thursday Jonathan & I came home to this:


Can't tell the difference? Let me show you the old one.


My parents totally surprised us with beautiful brand new shutters in our dining room. Remember how Jon and I had DIY'd some customizable ones from Home Depot? Well neither one of us were 100% happy with the end result. We were just glad that we were able to use them at all after the big mistake with the circular saw. 

After we had finished installing them my mom asked if I would replace them. I said "No, but I wouldn't get these for the other windows!"

Luckily my parents ignored me and ordered this behind our backs! I guess my mom had met the shutter man while we were at work. Sneaky. But so awesome. 

I didn't even notice when I got home from work. When Jon got home I met him in the garage. All of a sudden he asked "Babe, why are the shutters in the garage?" Cue my totally shocked and throughly confused face. "What? What are you talking about?" Jon starts to point at a corner of our garage. "The shutters are here. The shutters I installed. Look!" 

We looked at each other in bewilderment. Then I asked "Did they fall?" When we went to check the window we (finally) saw the new ones. Once the shock and confusion subsided I knew it had to have been my parents. We called them up and my mom tried to play it off at first. Then she asked how we liked it and said it was Jon's birthday present. 

It may seem like a strange gift but Jon (and me!) really loves the way it looks. He said and I quote "It makes our house look beautiful." I'm a huge fan too. Its a lot less busy looking than the old ones and it has the trim around the window which makes it look a lot more finished. And since we had been thinking about replacing it down the line, it saves a ton of cash since it our second biggest window.


A million thanks to the best parents! Such a lovely and thoughtful surprise. 

The Most Expensive Things In Our Home

Thursday, June 20, 2013

Our previously blank area above the desk is now showing off our diplomas!


Yes, they are the most expensive things in our home. The retail price on those little pieces of paper is almost $250,000. Nope, that's not a typo. Almost a quarter million dollars went into our brains!

They'd just been filed away in the desk. Lame! We worked really hard to earn those so I really wanted to get them up on the wall. My parents had framed both of my degrees and had given them to me to have at work right after I finished my Master's. When Jon and I bought this place I took them home to display. I completely forgot about them until I found Jon's diplomas when we were cleaning out the garage. Yes, they were in the garage. Probably in this pile somewhere.


Since my parents had gotten the frames from Costco I was thinking that there was a pretty good chance they would have more. Instead they had some that were super similar so I bought those thinking we could frame the diplomas by his and hers. As soon as I got them home, I tried to slip Jon's diplomas in there but they were too big! By just a tiny bit (doesn't it always happen that way?). My mom suggested cutting the diplomas!!!! NOT going to happen. Jon would have a heart attack if I cut those up so I made color copies of them and cut up the copy.

That sat on the dining table for a week. That's our thing. Leave things out for a while until I feel like getting on it. Then I end asking Jon to help me do whatever it is that needs to get done. It took me forever to get our framed monogram done.

One night after work (just another exciting evening! Kind of like this one.) Jon and I finally got around to hanging them. We decided that a small framing grid would look best. I must have had Jon hold and it at a few different heights until I decided it was perfect. Then Jonathan hung them up.


And we hated them. Exactly the way we felt about the old ugly mirror in the half bath.

Top: My MPA from Cal State San Bernardino & Jon's MBA from Claremont Graduate
Bottom: My B.A. in History from the University of Redlands
 & Jon's B.S. in Business Administration (Finance) from San Diego State
Those frames are too small for the space. We'd prefer something bigger, maybe with a mat. I also think the color is too similar to the paint and it all blends together. They just look blah. They don't really stand out and look the opposite of impressive. Sooooo now I'm back to searching for four bigger and better ones. But you know its hard to find four matching of anything at Ross. In the meantime these will just remain as is.


Goes to show (once again) that not everything we do around here is a success. Remember Jon's battle with the sink, my stenciling debacle and the shutters? But it's still better than a big blank wall. At least those diplomas are up!

Too Pretty To Eat In

Tuesday, June 18, 2013

So I meant to post this in the morning but got totally engrossed in Candy Crush Saga! If you're my Facebook  friend please send me lives ;)

The dining room is complete!


We've already painted, added shutters and purchased a brand new dining table and chairs. Although its a huge improvement over what we had before, it still needed the final touches. You know, the stuff that makes it pretty.

Please excuse my face in the photo below but I had to send my mom a photo!


It looks so much better with a that new mirror. It's from a Kirkland shopping trip with my mom. It looks so much better in person but I couldn't get a good photo without being in it. The original price was $99 but it was on sale for $69. Thanks to a 15% off coupon it rung up at $59.49. I had a gift card from Jon's old coworkers (thanks guys!) and I ended up paying $2.04. Does anyone else notice I get these amazing deals when I go shopping with my mom? Remember our $120 dining set?


Jonathan hung pretty close to centered. We had to work around the studs. I think once we get rid of the overhang (you can see it in the corner of the second photo) from the kitchen counter it will help it seem more centered. And can you believe they called that little overhang part a breakfast bar?


My personal favorite is the new vase. The size works way better now and its actually a focal point of the table. You can see the old here from the Deeply Discounted Dining post. Its actually two vases. The outside one is the large oval shaped one with a dented pattern. I purchased a smaller cylindrical vase that's open on both ends and just placed it inside the big one.


This works perfectly for all of our old wine corks. I placed them on the outside of the inserted tube. When we're done with a bottle I write the date, event and people that we were with. I have all the ones from our wedding and honeymoon along with a few random ones. The one photographed below is the the very first one in our collection: "celebrating our first home with the Behrs, Shirley, Jeff & Winston!" A sentimental favorite :)


The runner is from Home Goods for $10. We still don't have any placemats (can't believe we didn't register for any!) but I'm on the hunt!

Now that we've got all the accessories in place the room looks almost complete. We still need to purchase a new lighting fixture and a rug. And I really want to add wainscoting in there. I just think it would break up the darkness of the room and make the gray grayer and the table pop. And the flooring... I HATE that tile!

The end result is a dining room that's too pretty to eat it. I don't want to make it messy so we still eat on the couch. So comfy! Overall I'm really happy with the progress we've made and I think the work in this room is momentarily over. We have to look and save up for the right light and rug. Unless I can convince Jonathan to install some wainscoting.....


The Shutter Story: The Salvage

Friday, June 14, 2013

Finally! Our shutters are installed.

Remember how Jon and I completely screwed up our first attempt at installing shutters? No? Wish we could. 

Allow Jon to remind you where we left off.


The Shutter Story: Jon Screws Up from Berennisse Behr on Vimeo.

Yep, we accidentally cut one shutter too short and it was no longer useable for the bedroom window as planned. Day 1 was a total bust.

We woke up in a much better mood the next day. The pieces (you can see me discussing our plans here) we had cut were jagged and the two mounting bars that would sit flush together looked really bad together. Jonathan suggested buying a power sander to help us smooth out the cut pieces to make them fit better. After another trip to Home Depot (that would make it 4 trips to 2 different locations), we sanded all the cut pieces.


Jonathan was really happy because it looked so much better. Like maybe we could have the shutters look decent. 

Then we could finally install them! One and a half days later.... Jon measured where the mounting strips would go and I held them up while he predrilled the holes.


To install the middle pieces Jon used some L shaped brackets. He attached two L brackets next to each other in the center of the windowsill on the top and the bottom. Then he screwed the mounting strips to the brackets.


Then all we had to was slide the shutters on. That process only took about 40 minutes. Just like the instructions promised. 

We're not really happy with the final product. The fit is a little tight and the doors don't close exact but at least they're up. We've decided to just bite the bullet and purchase customized ones for the other windows. We might even pay someone else to install them. Everyone that has seen them says they look fine but naturally we are our own worst critics. 

The best part about this whole mess is that our dining room looks like its almost done. The worst part is that our bedroom still has some old drapes and is a freaking furnace. 

Here's what Jon had to say about the whole experience.


The Shutter Story: Jon Recaps from Berennisse Behr on Vimeo.

My favorite part is where he says "got your approval." :)

To summarize:
  • 4 trips to 2 different Home Depots (not counting our visit to their online store)
  • 2 new tools (circular saw & power sander)
  • 2 days (instead of 40 minutes)
  • 2 tired and frustrated homeowners  
  • $400 spent (half on the shutters and half on new tools)

NEVER. AGAIN. (Most likely... you never know. Jon might want to give it another go.)


The Shutter Story: The Screw Up

Wednesday, June 12, 2013

We bought DIY shutters to install in our bedroom. The box and product reviews said it would take about 40 minutes to install... well they lied! It took us TWO DAYS.


99% of the time all of our projects come out mostly as planned. Every now and then we'll have a tiny hiccup (like Jon's victory over the sink) but normally it just requires an extra trip to Home Depot and we're good. Not the case with our shutters.

The previous owner had frilly lace valances on all the windows. That's it. No blinds. Not only could everyone see into our home there was also no way for us to block some light and heat out. No sleeping in. No way to help keep our house cool. The weekend we moved it we put up cheap drapes and have been using that ever since. Its not a big deal throughout the house except in our bedroom. Its the hottest room in the house and its visible by other units which means limited privacy. 

We had always planned to install shutters throughout the house but put it off because they're crazy expensive. Since spring is coming to an end and summer with its 100 degree heat is here we knew we had to get on it (that's why we did the cover patio). After lots of research and pricing out different sources we were sad to find that the best deal we could get was a little less than $400 for ONE window, not including installation! We only have 4 windows but would still be around $1600! Yeah... no.

So we turned to googling DIY Shutters and there was a whole lot of nothing. My BFF Home Depot saved the day. They sell shutters in a small variety of sizes that generally fit to standard sized windows. At $200 it was waaaay cheaper than the customized ones we had been looking at. AND you could buy it online! One less trip to Home Depot. Jon & Berennisse = SOLD. To be on the safe side we only ordered shutters for our bedroom window figuring if we liked it we'd order the rest.


On Saturday of Memorial Day weekend we decided to install it. We measured, bought a circular saw and made three Home Depot trips in preparation. And then we ran into our first problem. There wasn't a shutter big enough to fit our window so we ordered two thinking we would combine them to make a big one that opened like an accordion. A ton of people had left pictures when reviewing the shutters online and it looked like they had done it so why couldn't we? Apparently pictures lie.

Jonathan looked at me and said we couldn't do it. We could install them as two different ones using brackets but it would not open like an accordion. I sulked but ultimately decided to just do it. We go back upstairs and run into our second problem. The shutters were just a hair too wide. Seriously? This project had already failed before we had ever started to work.

The shutters are designed to allow you to cut a little off the top and a couple of inches off the bottom. The only place you're not supposed to cut is on the little bar used to mount the shutters. After another debate we decided to just go for it. It only required a small adjustment to shave off an 1/8 of inch in order to make it fit. We didn't think it would be that big of a deal and decided to just cut one set of shutters so we could return the second one

We donned some safety googles and finally got to cutting.


The first two panels went relatively smoothly. I held the shutter in place while Jon cut. That saw is not a joke. You have to hold it steady in order to cut and the chips come flying off in every direction which really hurts. Jon and I were covered in tons of tiny pieces. Because of the vibration and you having to hold it place it was hard to cut in a perfectly straight line. The pieces weren't cut perfectly but Jon tried to straighten it by sanding them smooth.

Then it got all screwed up. I really want to use another, stronger word but I'm trying to keep it classy. We started on the third shutter. Jon measured and I held the shutter in place. Then Jon got ready to cut. As soon as he started to cut I knew we had messed up.

Jon used the wrong the guide mark on the saw and cut it too short. 

Unfortunately it was too short to salvage. No shutters for the bedroom. And since we had already cut the second set of shutters we couldn't return them. Goodbye $200!

Imagine us tired, frustrated and full of choice words aimed at the saw and shutters. We were FURIOUS.

After we calmed down I measured the window in the dining room and realized it was a little bit smaller that our bedroom window. The shutter we had cut too short was still going to be a little small but it would be a lot less noticeable. 

So at 10 pm we started the whole process over again. Measuring and cutting all the shutters. We also had to cut two of the mounting devices since the dining room window is not as wide as our bedroom window. Jon was hesitant to do this but in the end we knew that we had to try to salvage this project. What was the worse thing that could happen at this point? See me explain below.


The Shutter Story: The Screw UP from Berennisse Behr on Vimeo.

After that we were fried. We finished cutting and went to bed. WORST PROJECT TO DATE. 

Stay tuned for part two. The Shutter Story: The Salvage. 

Come On In!

Monday, June 10, 2013

Behold! The power of paint!


Check out the boring before:


Jonathan and I finally started working on the main living space of our house. Its an open space thats divided into four spaces: the living room, dining room, kitchen and entryway. Obviously we've already started in the dining room but we wanted use a different color living room and entryway.  After much debate we selected this light neutral from Behr paint. It was actually pretty hard to chose a color because we plan on using it throughout the downstairs. We want it to complement the deep gray we have in the dining room and whatever we decide to do in the kitchen one day. 

We decided to start by our front door for a few of reasons. One, we didn't have to move any couches. Two, it's a small space so it wouldn't take the entire weekend. Three, once we add a piece of artwork in that empty space behind the door we're done!

I gathered all the painting supplies and Jon did his thing.


After he was done I cleaned up. I removed all the tape, cleaned and reattached the switch plate and replaced our "S" wreath. Isn't that a pretty wreath? It was a wedding gift from a crafty coworker. Normally it's  on the outside but when I hang a holiday wreath I move it inside. Right now its been temporarily replaced by our 4th of July wreath.


I've just been staring at the corner. Out of all the paint colors we used so far this is my favorite. And since the half bath is right next to it I can pretend our house is actually all done. If I'm looking at from the right angle from our couch.

The Month in Review: May 2013

Thursday, June 6, 2013

What Jonathan & I did in May:

'MERICA!

Tuesday, June 4, 2013


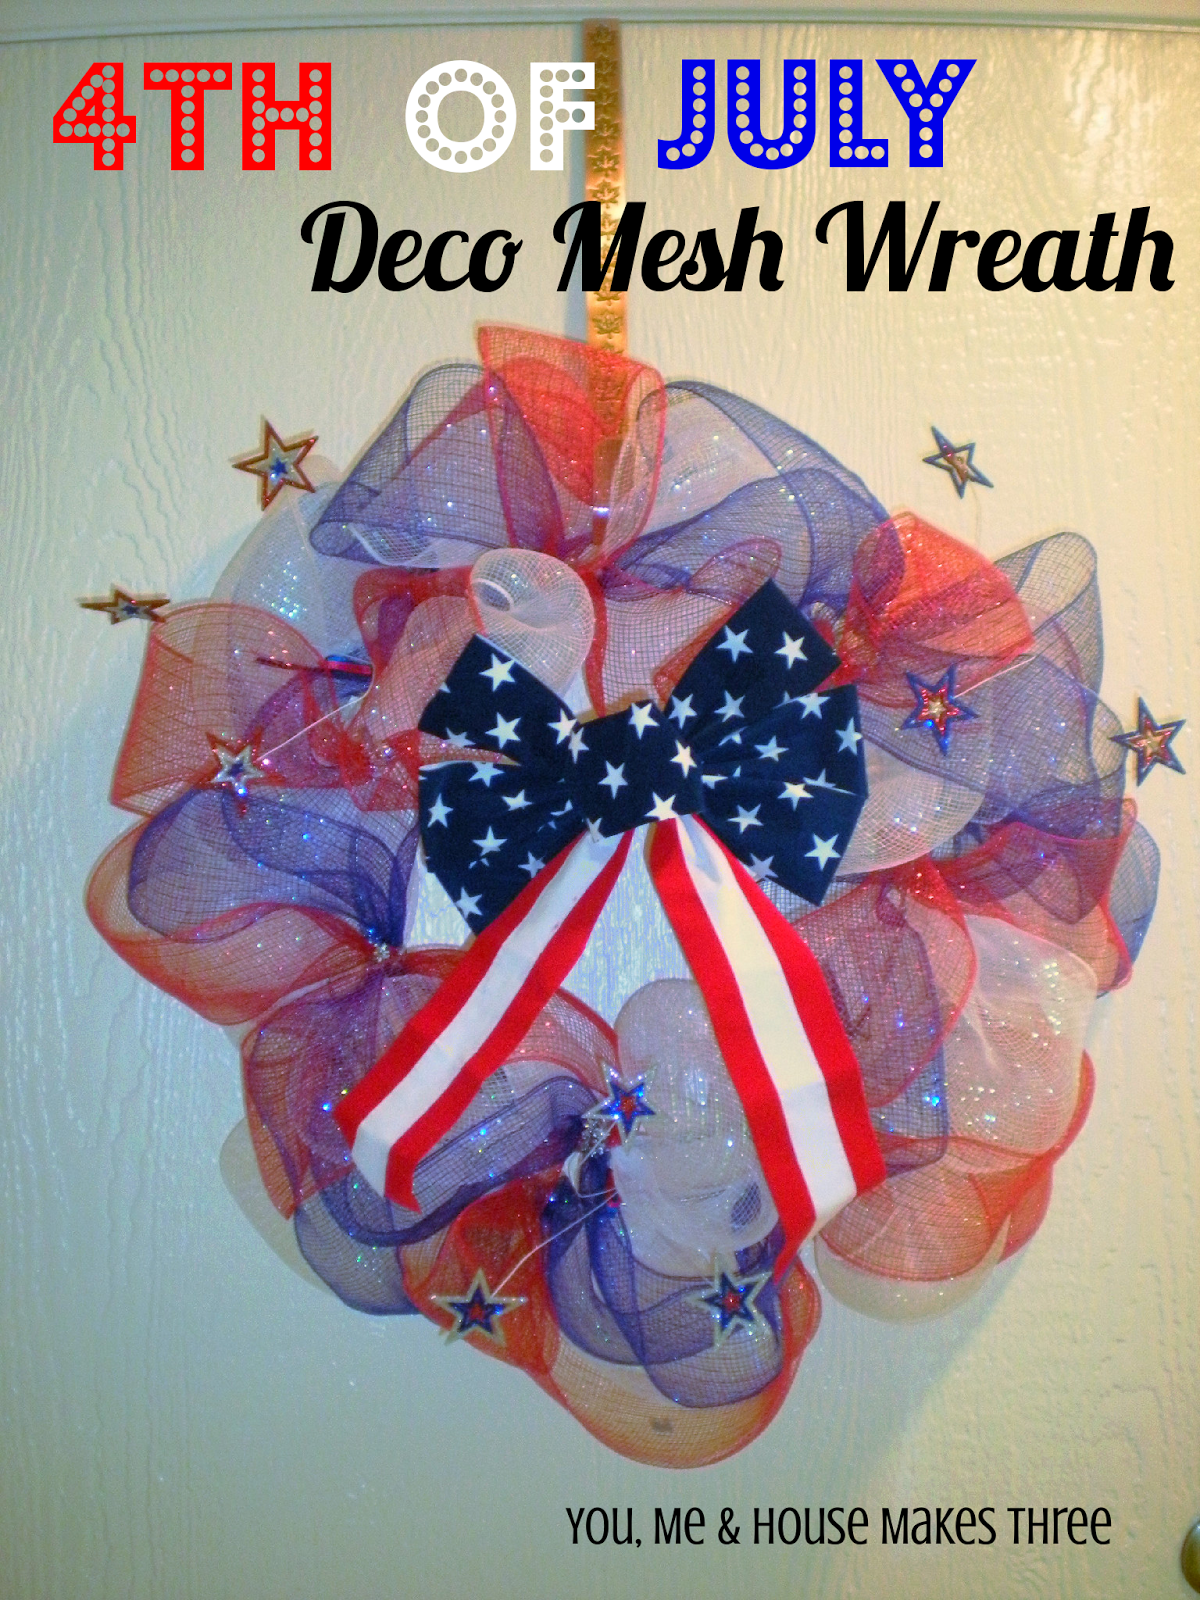
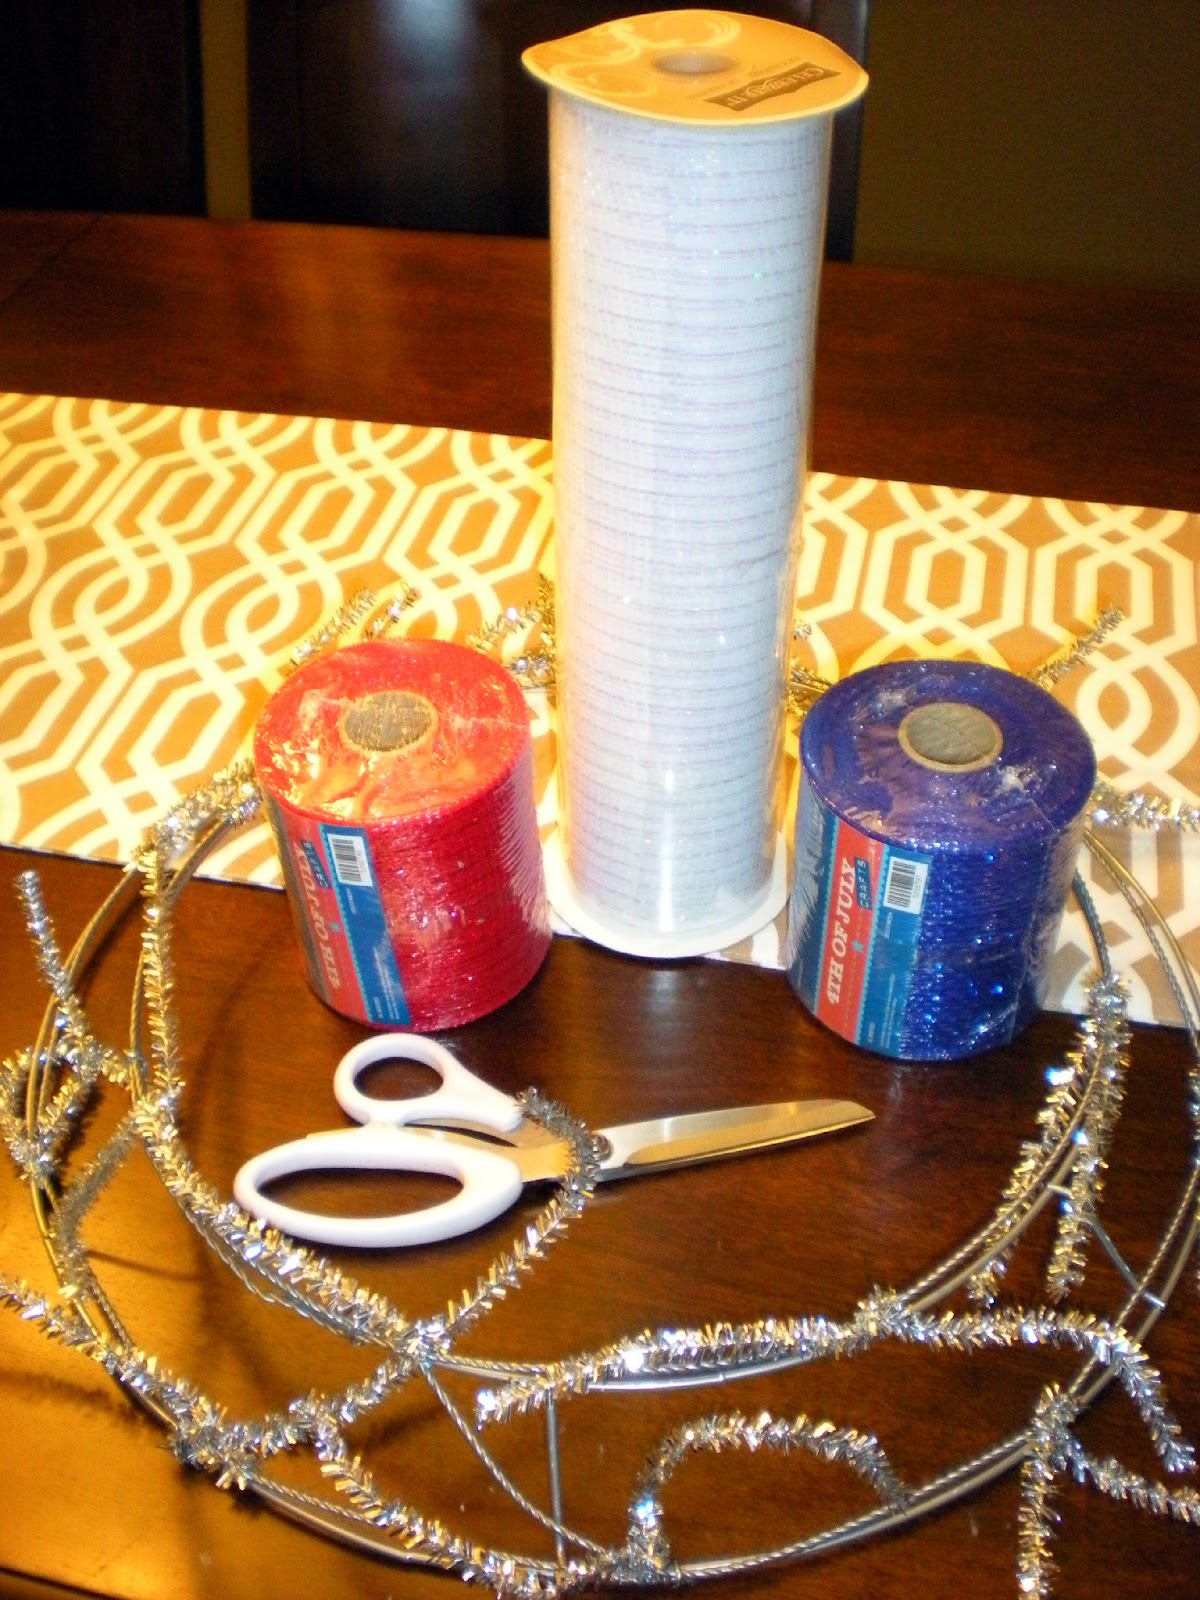
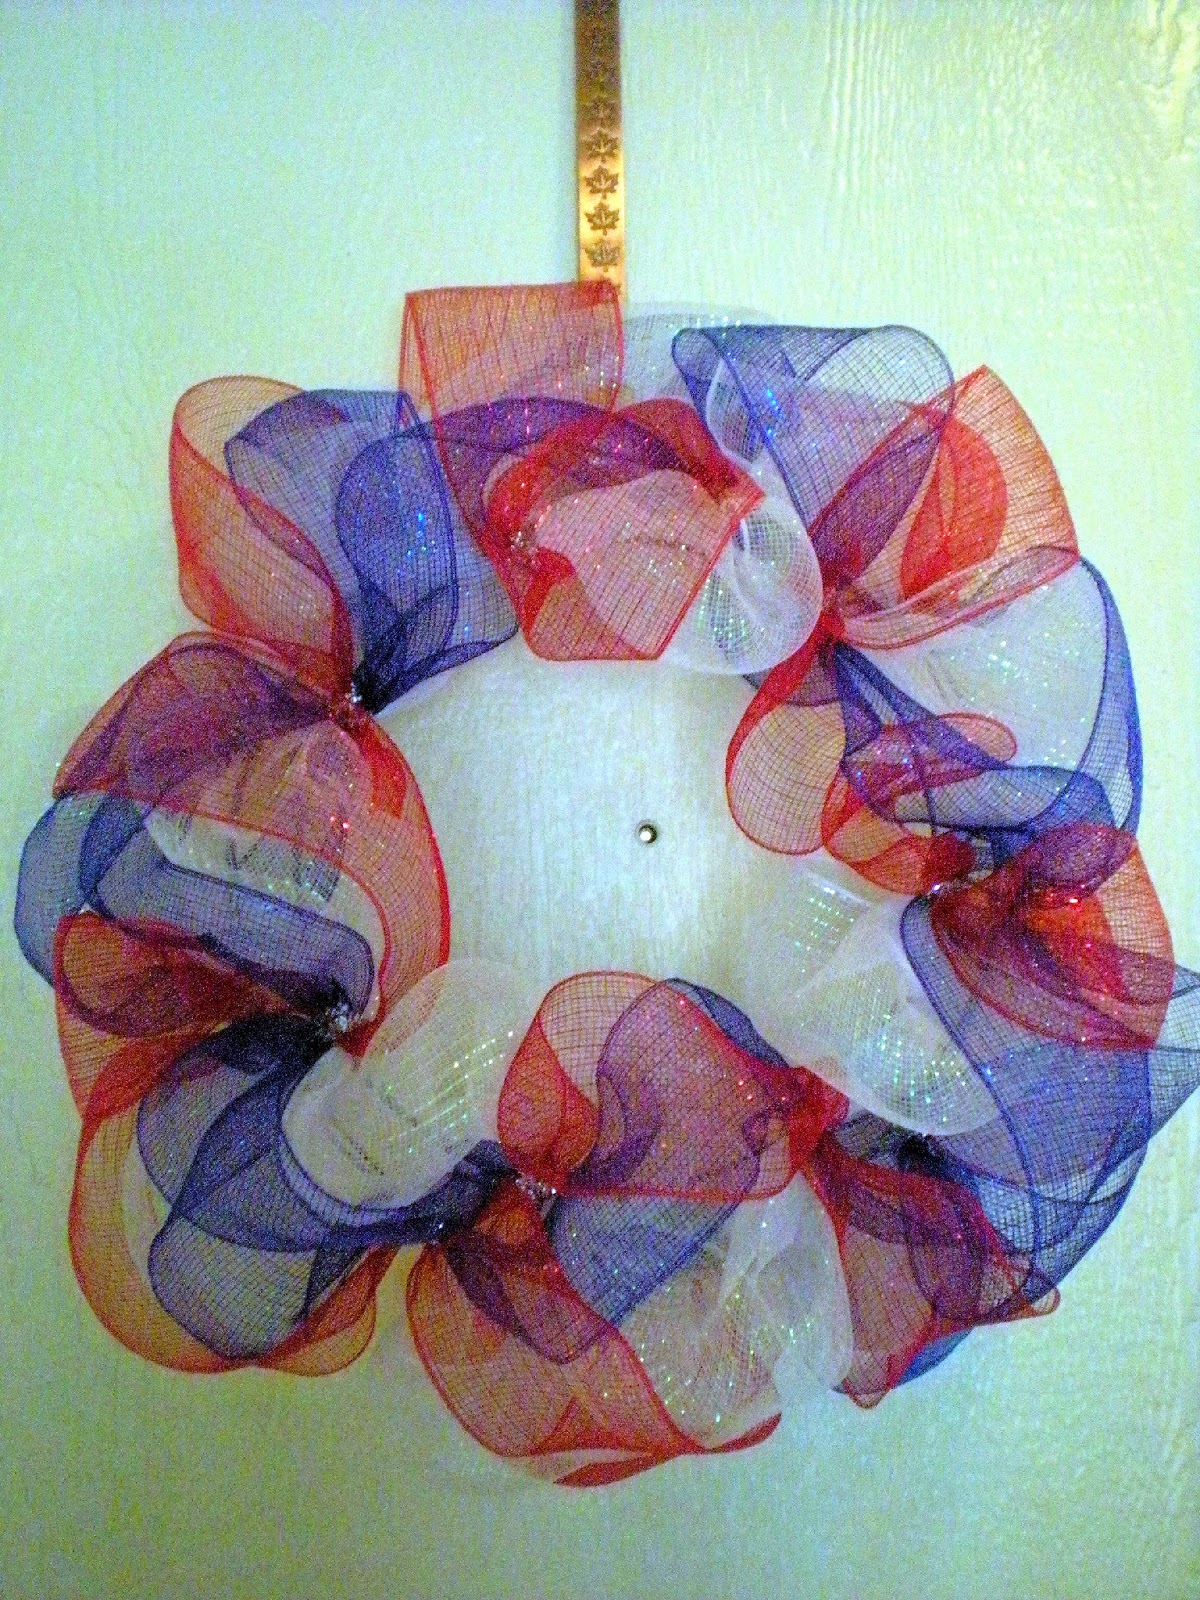
In spirit of America's upcoming birthday I decided to made a 4th of July wreath. It's super easy and probably only took about 30 minutes to make while Jon and I watched TV. I used deco mesh to make the fluffy wreath part and then added the stars and flag bow after an impulse purchase at Michael's. The red and blue deco mesh ribbon is from Hobby Lobby.


The whole thing probably cost about $12 to make. I already had the white ribbon and the wreath frame. You can get them at any craft store but I recommend Hobby Lobby because they always have a good selection of colors.

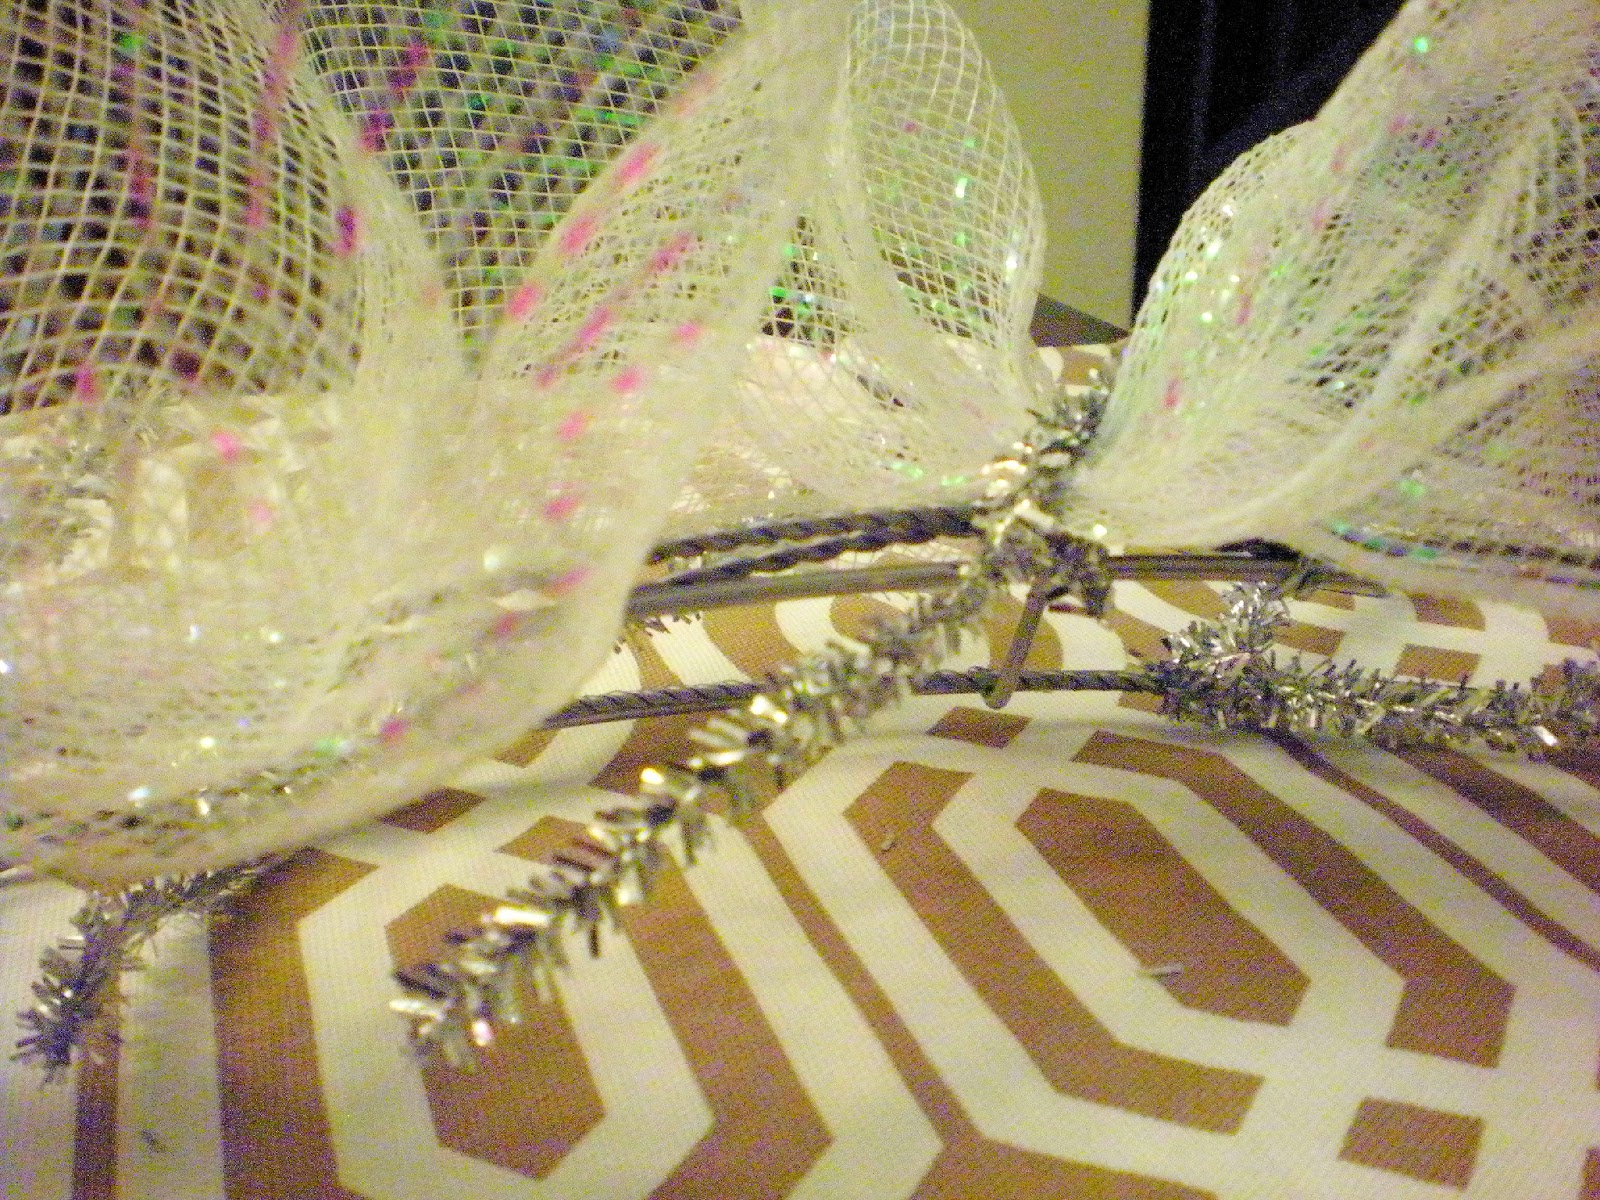
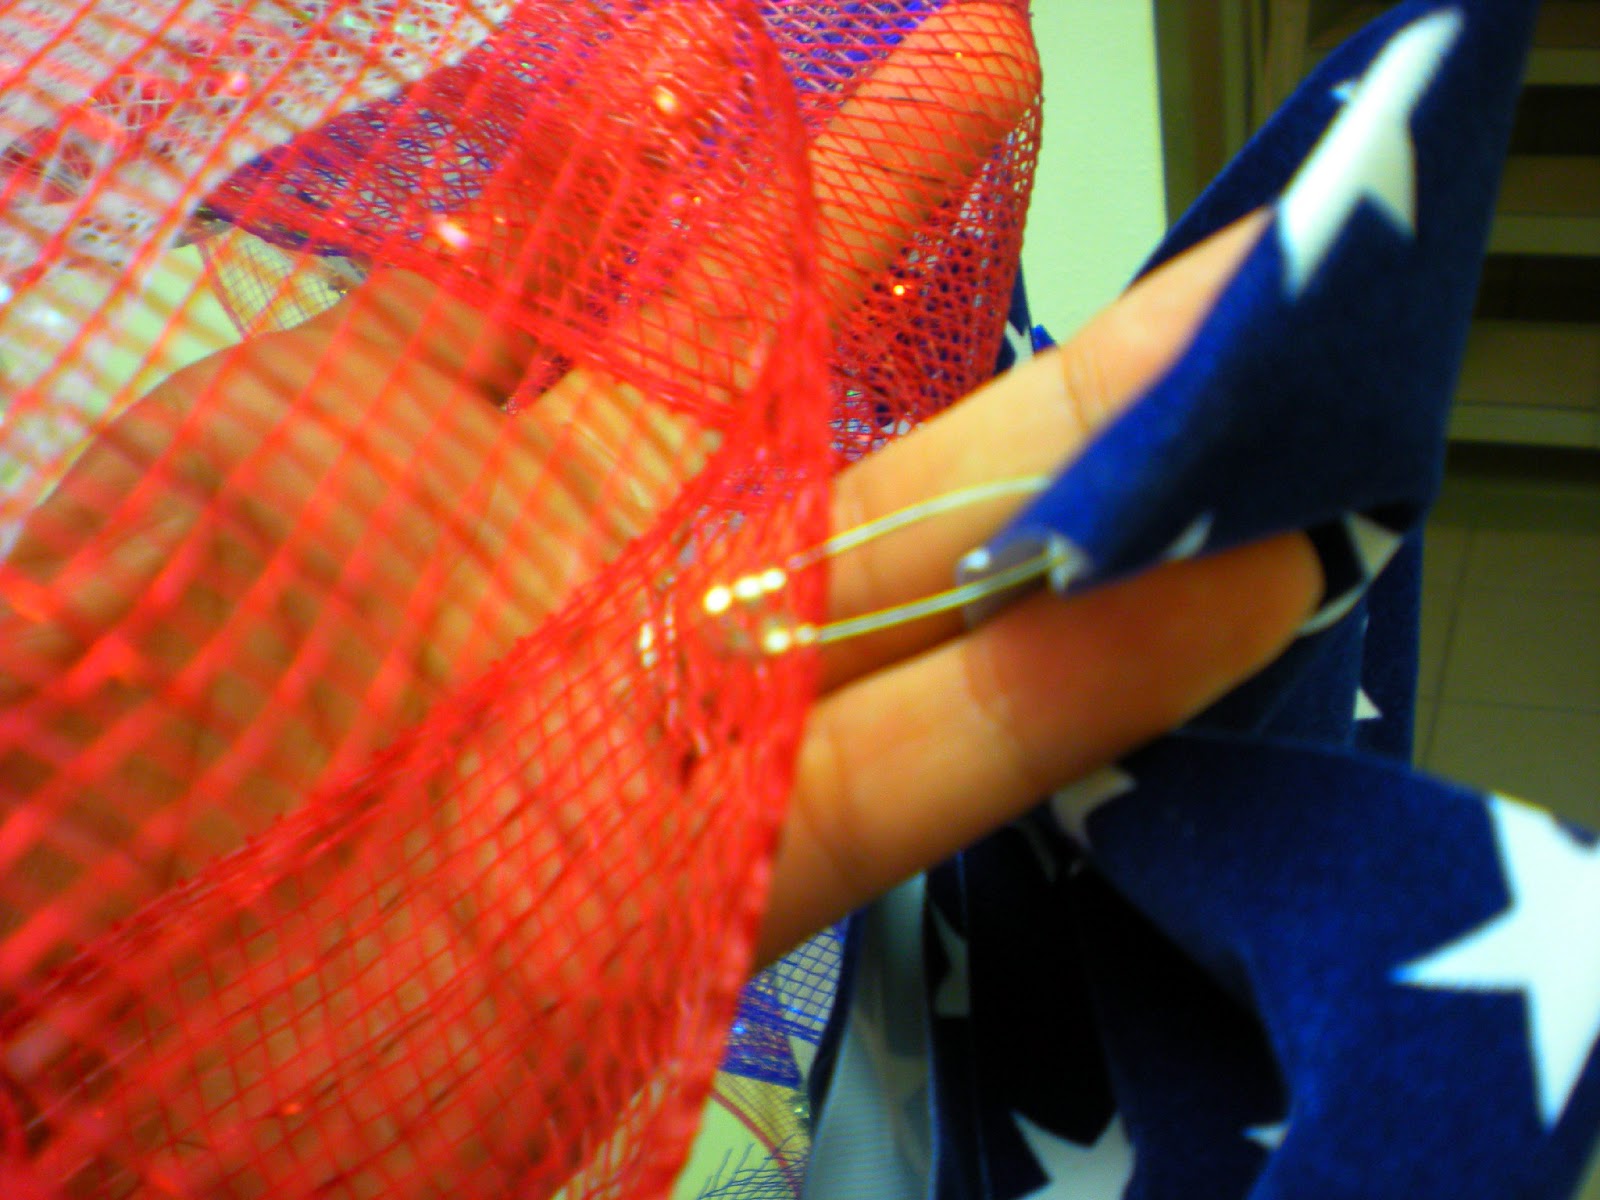
First I grabbed the white ribbon and attached it to the wreath frame. To start you bunch up the end and secure it to the frame. This frame came with silver pipe cleaner-ish things attached in multiple places around the frame to hold the ribbon in place, but in the past I've used ornament hooks or any easily bendable metal. Then you just make a pouf (kinda like Snooki would do) and, once you like the size of it, secure it with the wire thing.


I wish I could explain better but here's a video from Better By The Bite to show you what I mean. I didn't follow this tutorial (I do what I want, there's no wrong way in crafting!) but I think she does a really good job of showing how to attach the deco mesh to the wreath frame. And her wreaths are super cute. I started to take photos but stopped because they're not really that helpful (can you even tell what I'm doing?) and I was in the crafting zone.

For the white ribbon, I attached it in a zig zag fashion until I hit all the pipe cleaners. I twisted the wires, securing the ribbon but still leaving some extra wire exposed to attach the red and blue ribbons on top. You could skip some of the pipe cleaners to leave it for a different ribbon but I wanted to add lots of white since it makes the wreath look fuller and provides a good background for the other colors.

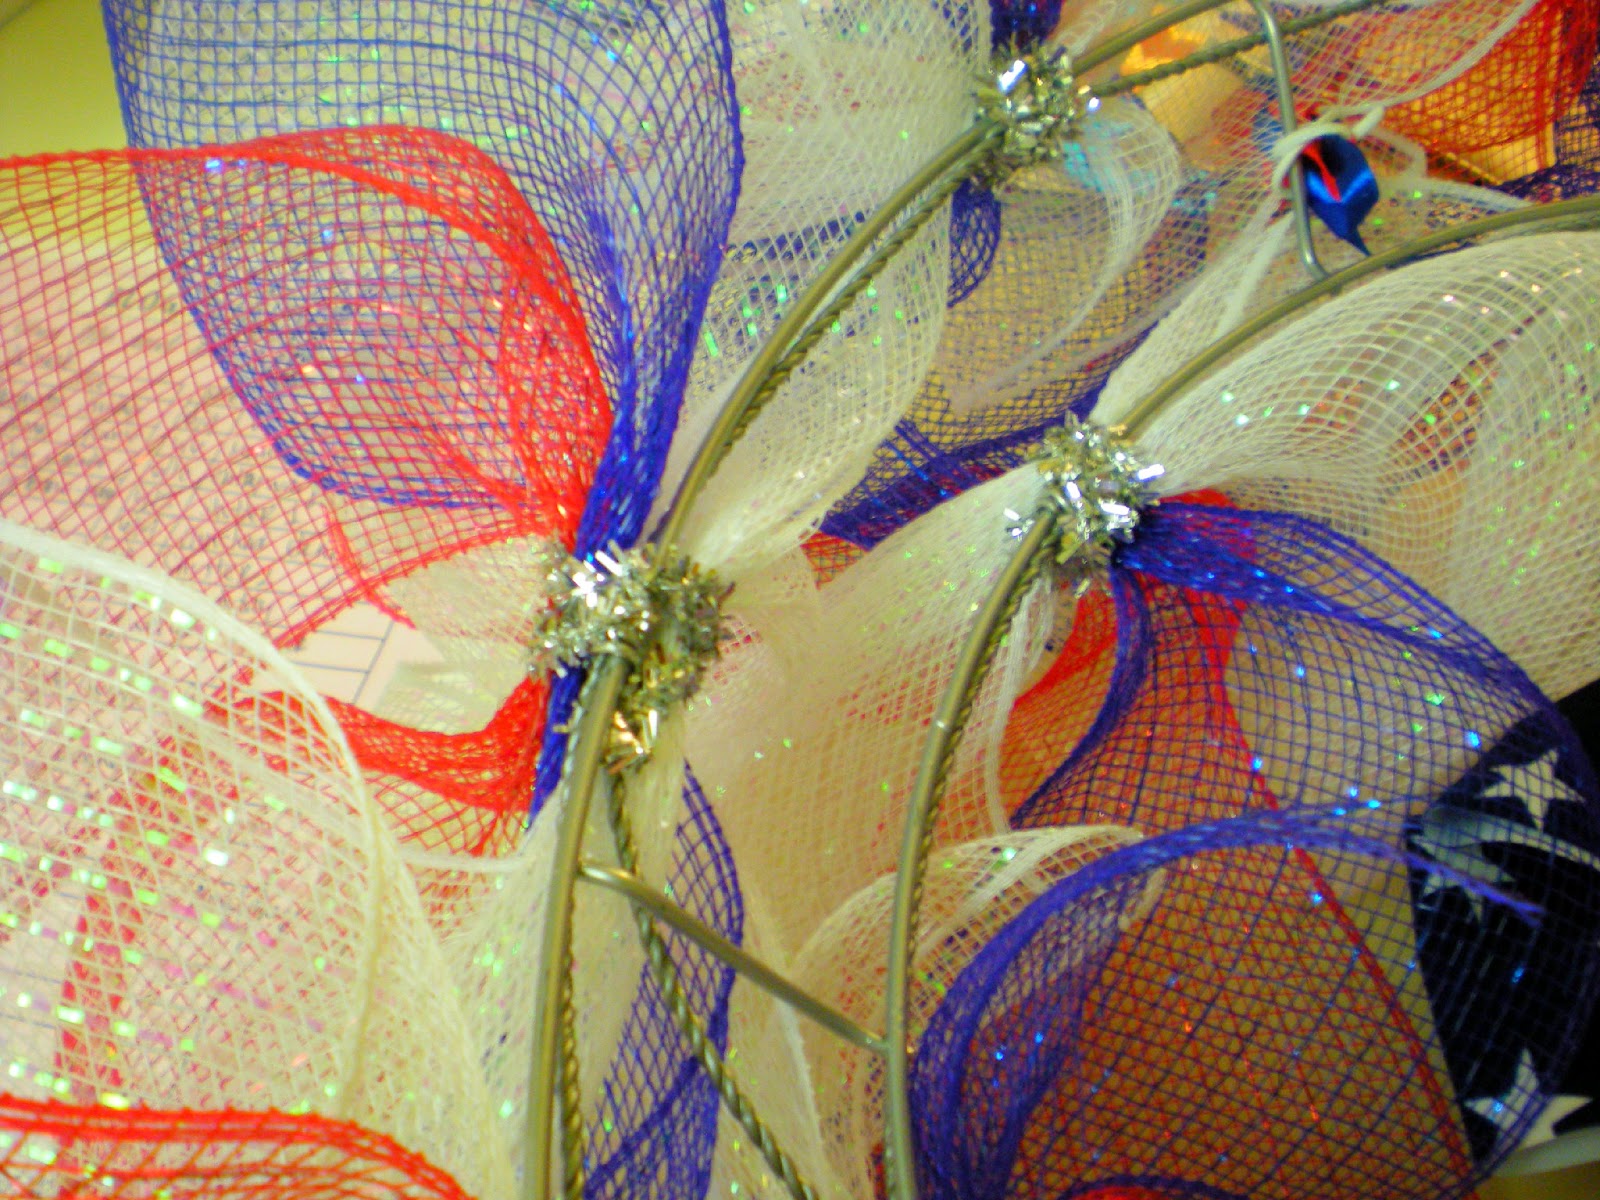
Then I grabbed the blue ribbon and attached it on top where I started with the white. This time I jumped around to every other wire to leave room for the red. Once I was done with a pipe cleaner I made sure to twist it really tight around the deco mesh and the wreath frame so it didn't slip off.


When it was time for the red ribbon I just used the wires that didn't have any blue ribbon attached to them. I also made sure that the ribbons all looked good together and weren't crushing the other colors so it didn't look flat.

At this point I thought I was all done, sent a picture to my mom and hung it outside.


But the next day I went to Michael's (for a totally unrelated crafting errand) and I saw an American flag bow as soon as I walked in. Immediately I knew it would look good in the center of the wreath and it was only $3! Next to it were red, blue and silver stars picks. Those are picks that are usually placed into floral arrangements. I grabbed one in each color. I think they were each $1.29? I wish I had taken a photo before I added them to the wreath but I totally spaced. Blame it on my crafting high.

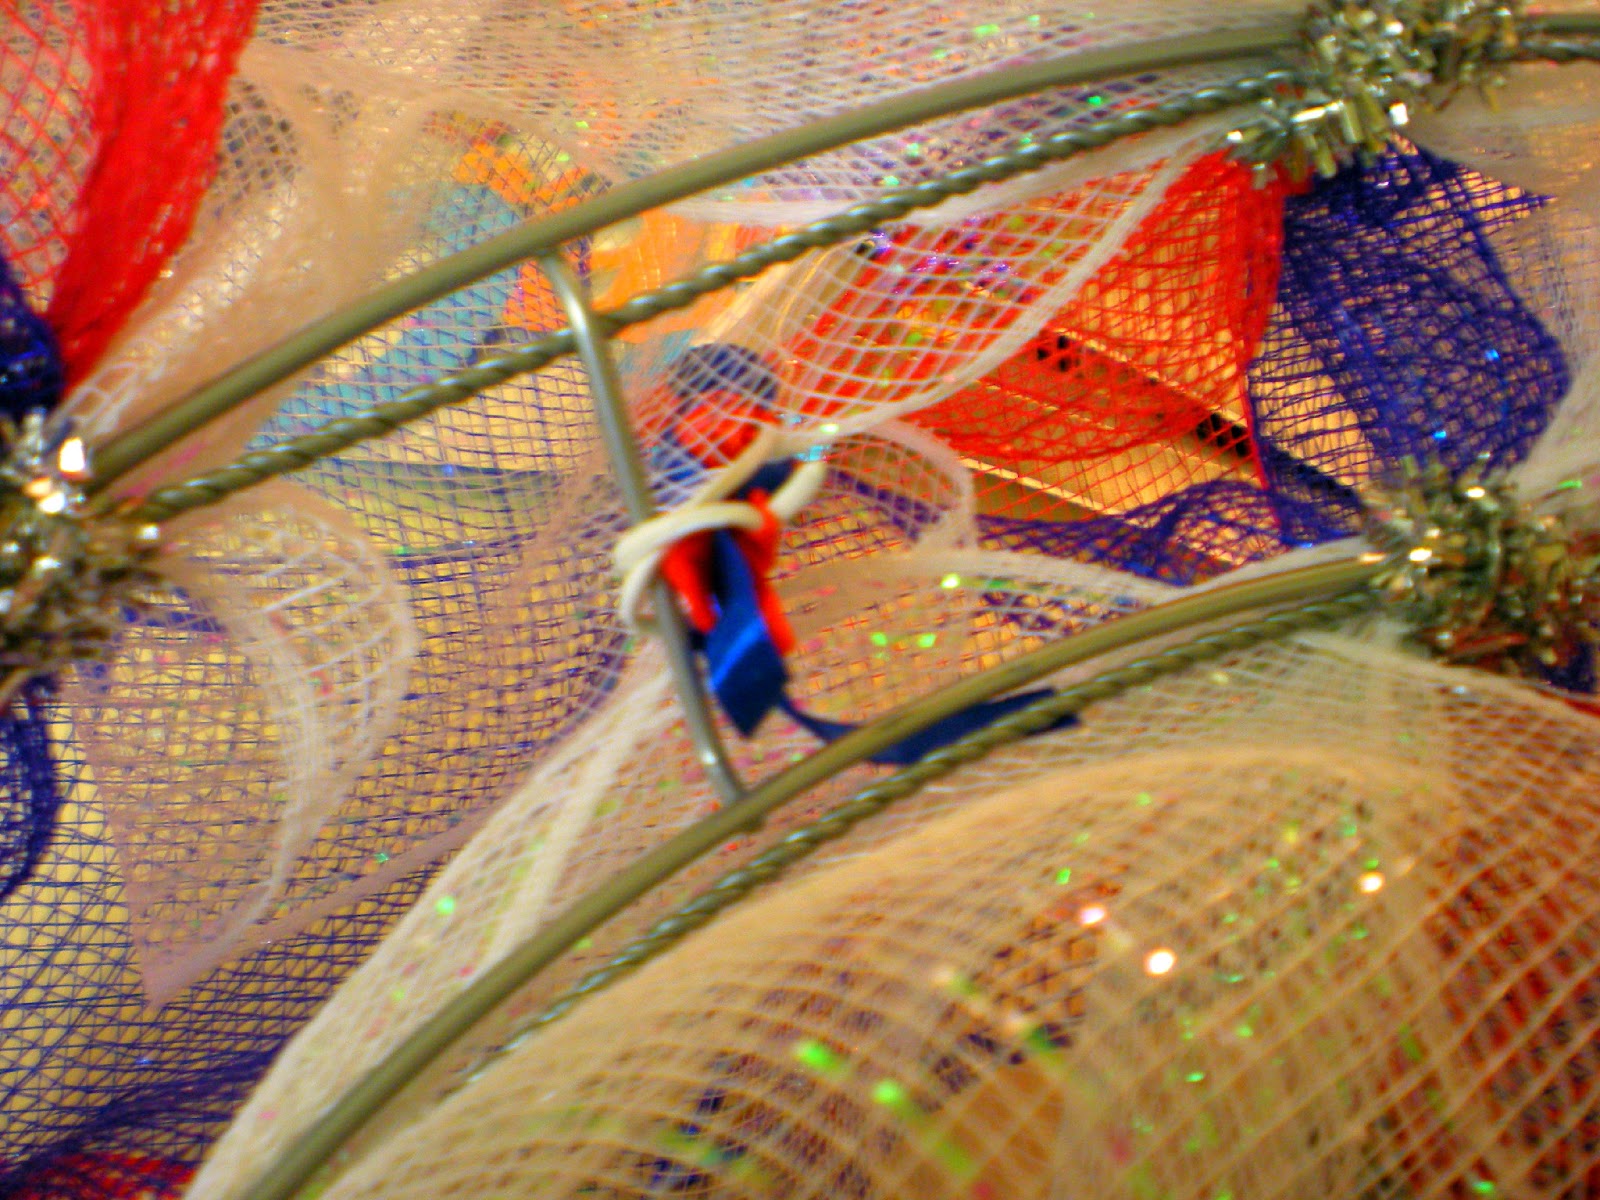
Back home (where Jon was probably wondering what took me so long) I secured the bow by safety pinning the top two corners on either side to the wreath.


I placed the stars around it and tightly wound the pliable metal base around the wreath frame. Then I moved the bunched stars around until I like the way it looked.


Then I showed Jon, sent a picture to my mom and hung it outside.


Happy Birthday America!